[ai_post_generator_toc]
Introduction
In this post, we deploy Azure OpenAI base models and test them in the Completions and Chat playgrounds. We’ll get a chance to explore the effects of prompts and parameters on text and code completions.
This post is based on Microsoft Learn documentation: https://learn.microsoft.com/en-us/training/modules/use-own-data-azure-openai/5-exercise
Prerequisities
- An Azure subscription, that has been approved for access to the Azure OpenAI service, is required. To request subscription access to the Azure OpenAI service, visit https://aka.ms/oaiapply. Access is restricted to approved Microsoft enterprise customers. The Azure OpenAI Service enables you to use your own data with the intelligence of the underlying LLM. You can limit the model to only use your data for pertinent topics, or blend it with results from the pre-trained model.
- .NET 7 SDK
Provision an Azure OpenAI resource
If you don’t already have one, provision an Azure OpenAI resource in your Azure subscription.
- Sign into the Azure portal at https://portal.azure.com.
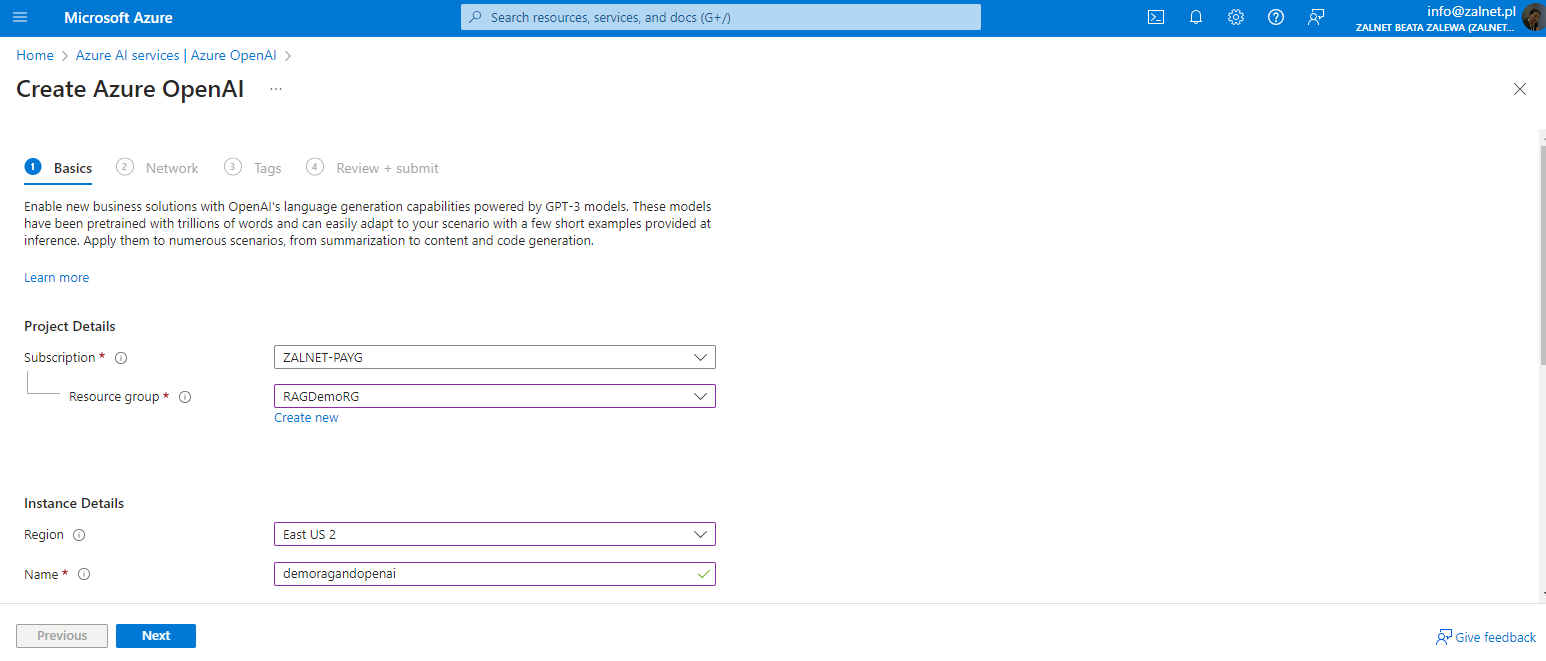
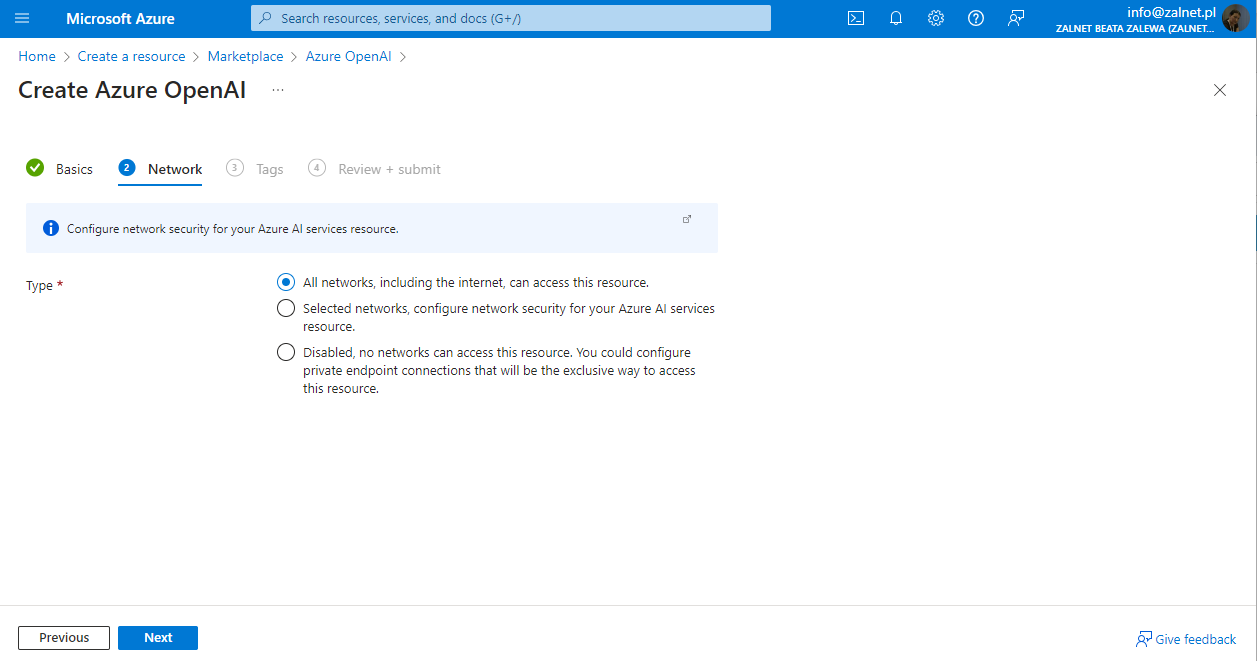
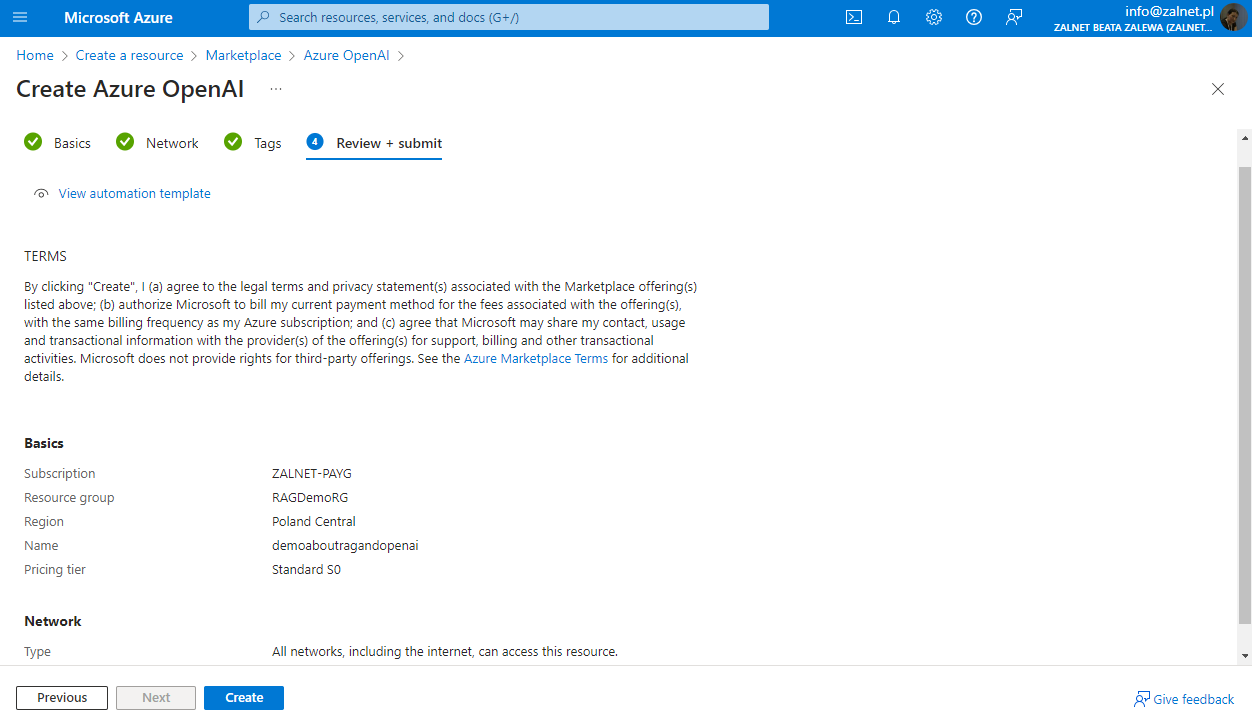
- Create an Azure OpenAI resource with the following settings:
-
- Subscription: Select an Azure subscription that has been approved for access to the Azure OpenAI service
- Resource group: Choose or create a resource group
- Region: Make a random choice from any of the following regions*
- Australia East
- Canada East
- East US
- East US 2
- France Central
- Japan East
- North Central US
- Sweden Central
- Switzerland North
- UK South
- Name: A unique name of your choice
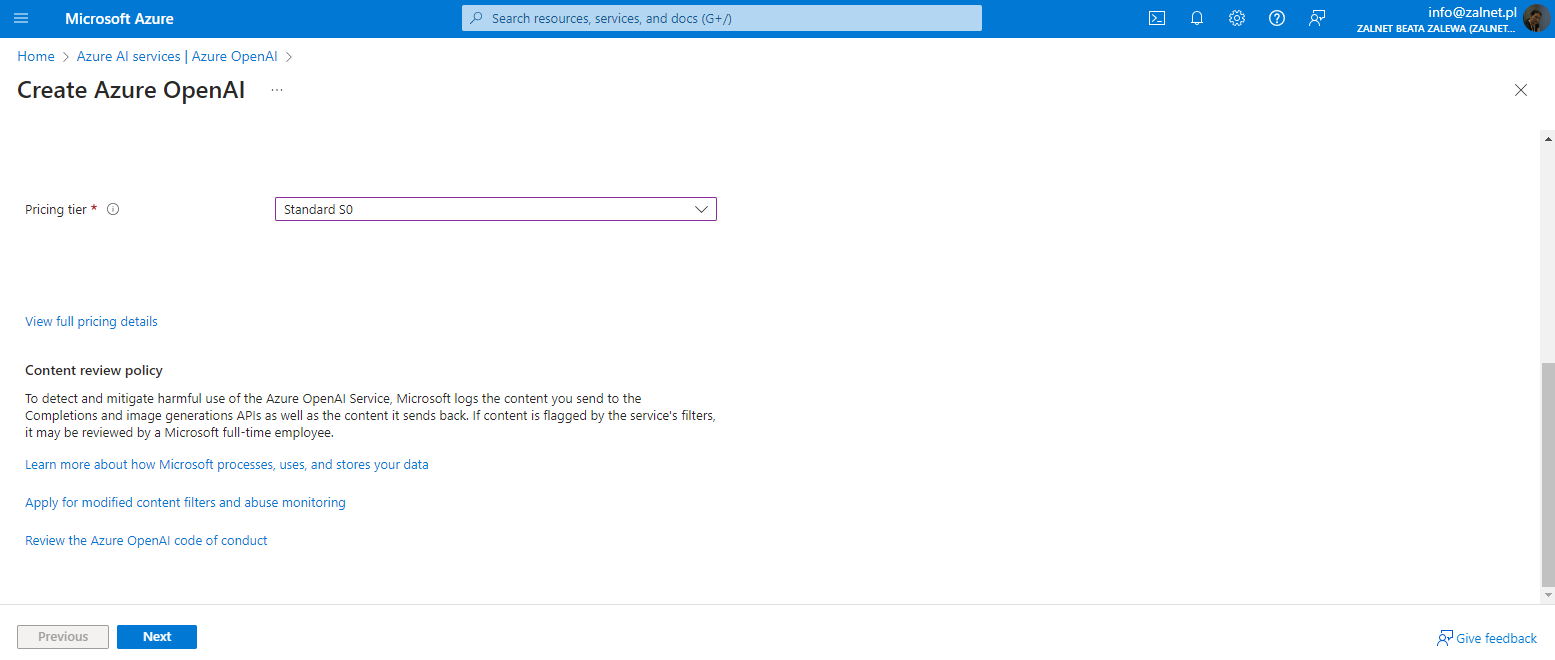
- Pricing tier: Standard S0
* Azure OpenAI resources are constrained by regional quotas. The listed regions include default quota for the model type(s) used in this exercise. Randomly choosing a region reduces the risk of a single region reaching its quota limit in scenarios where you are sharing a subscription with other users. In the event of a quota limit being reached later in the exercise, there’s a possibility you may need to create another resource in a different region.
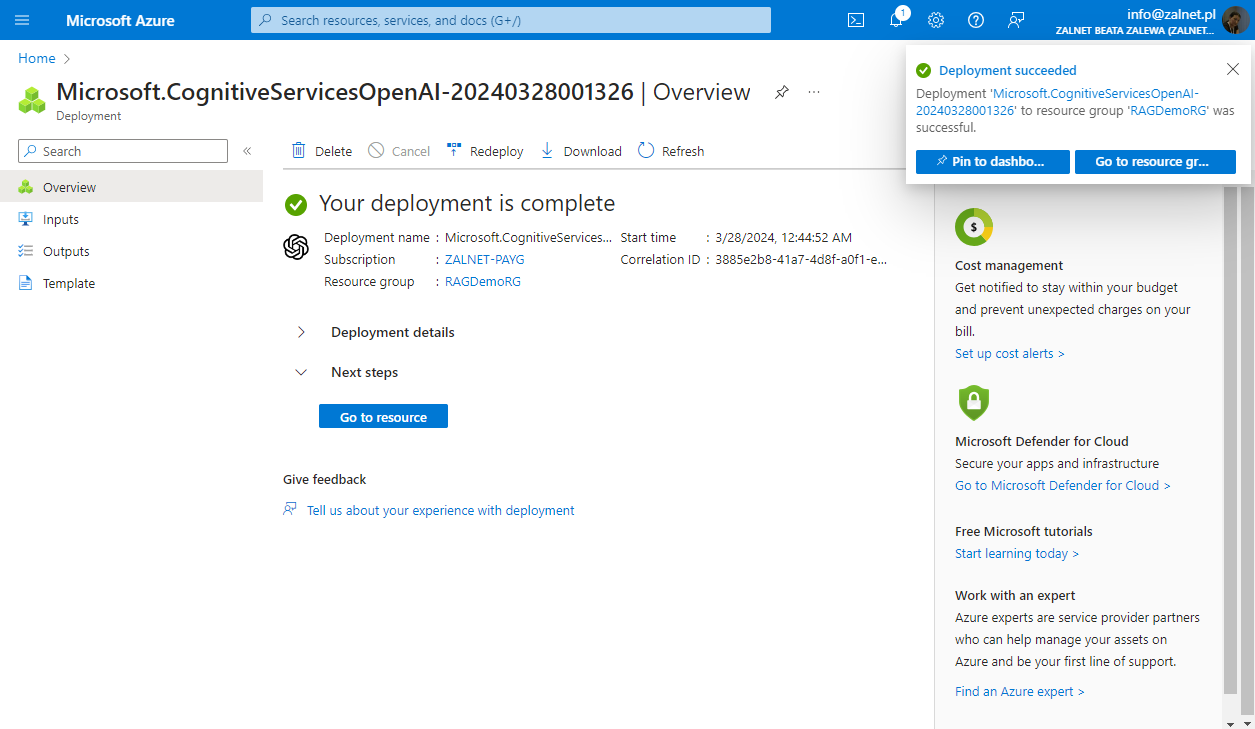
3. Wait for deployment to complete. Then go to the deployed Azure OpenAI resource in the Azure portal by clicking Go to resource.
Deploy a model
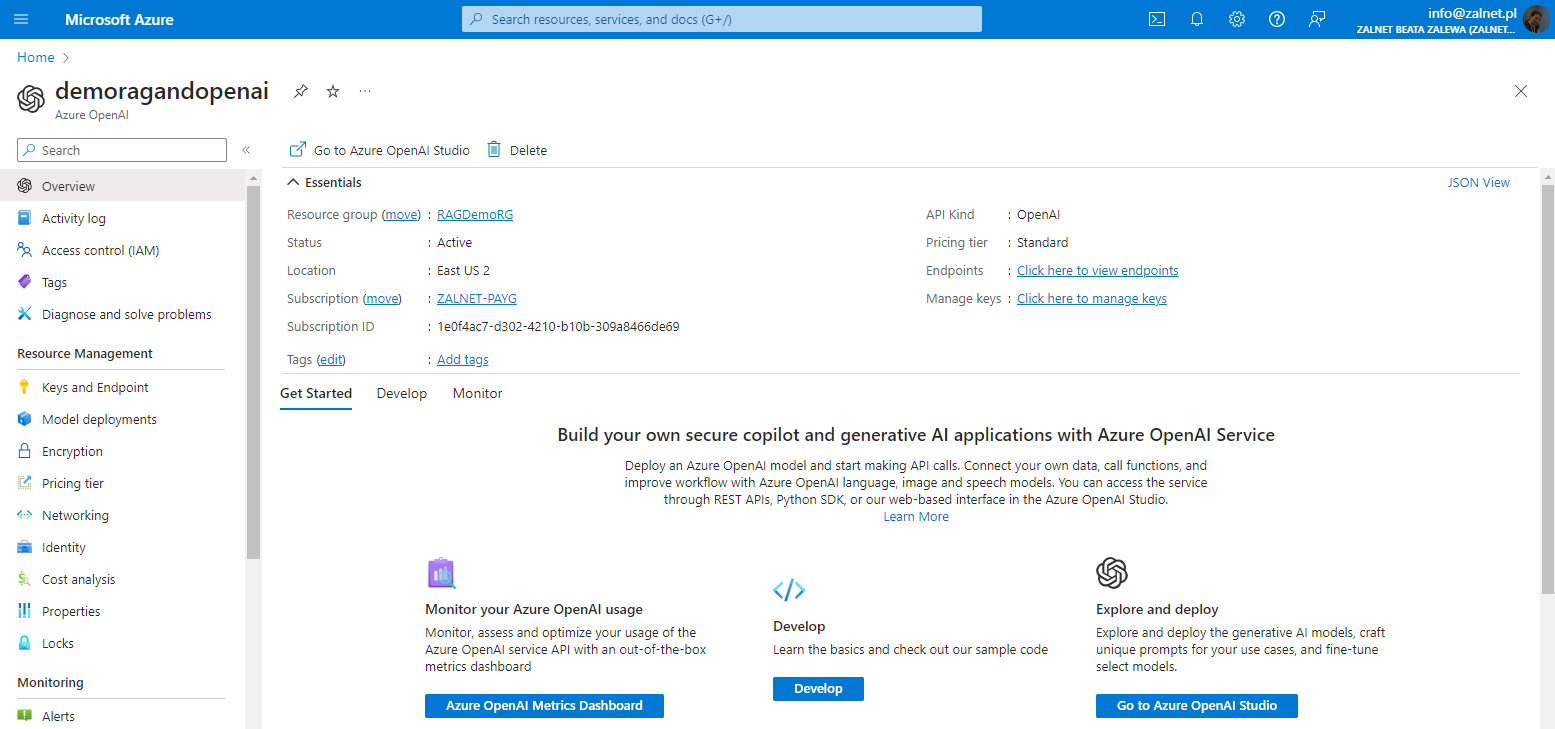
Azure OpenAI provides a web-based portal named Azure OpenAI Studio, that you can use to deploy, manage, and explore models. You’ll start your exploration of Azure OpenAI by using Azure OpenAI Studio to deploy a model.
- . On the Overview page for your Azure OpenAI resource, use the Go to Azure OpenAI Studio button to open Azure OpenAI Studio in a new browser tab.
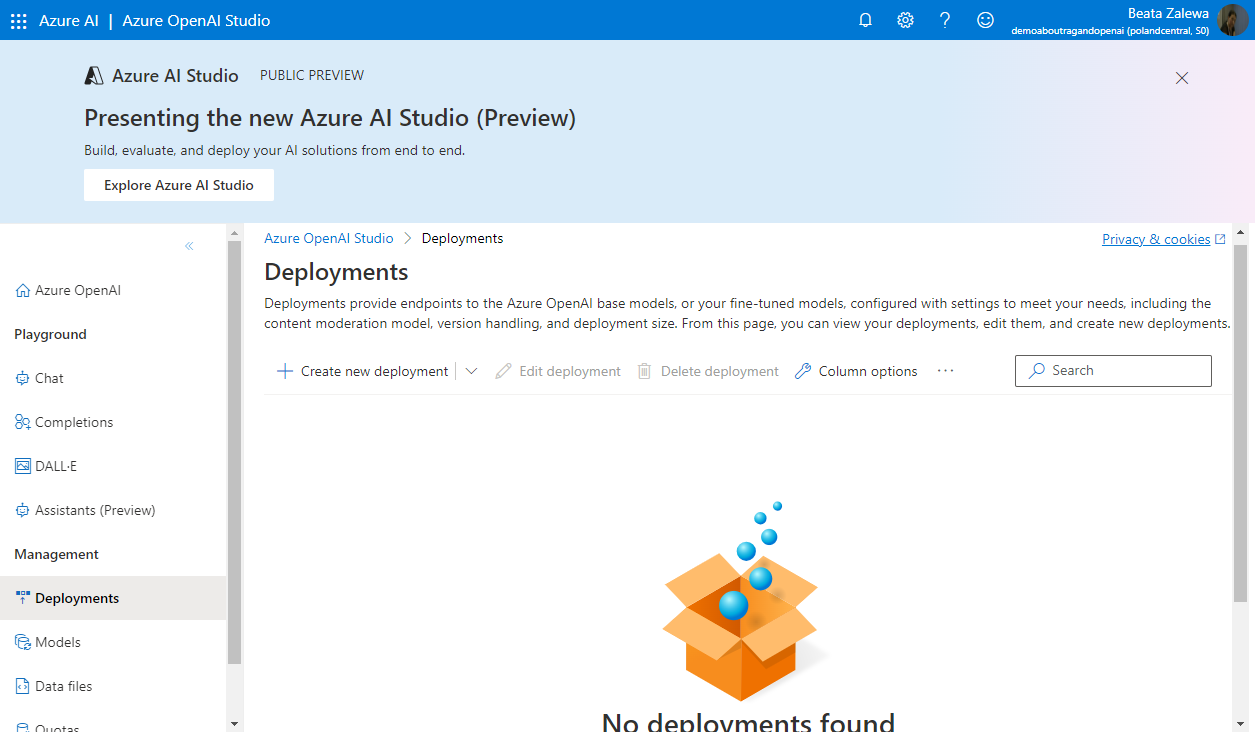
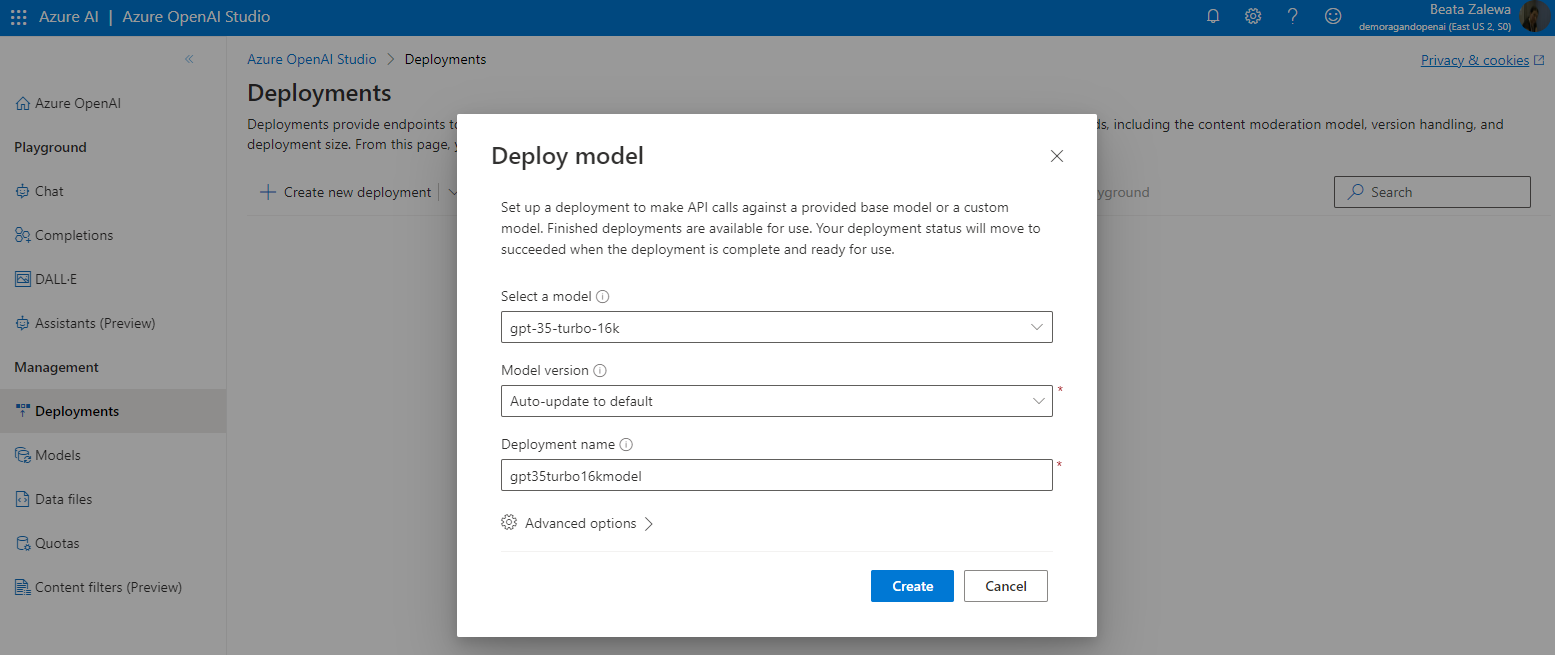
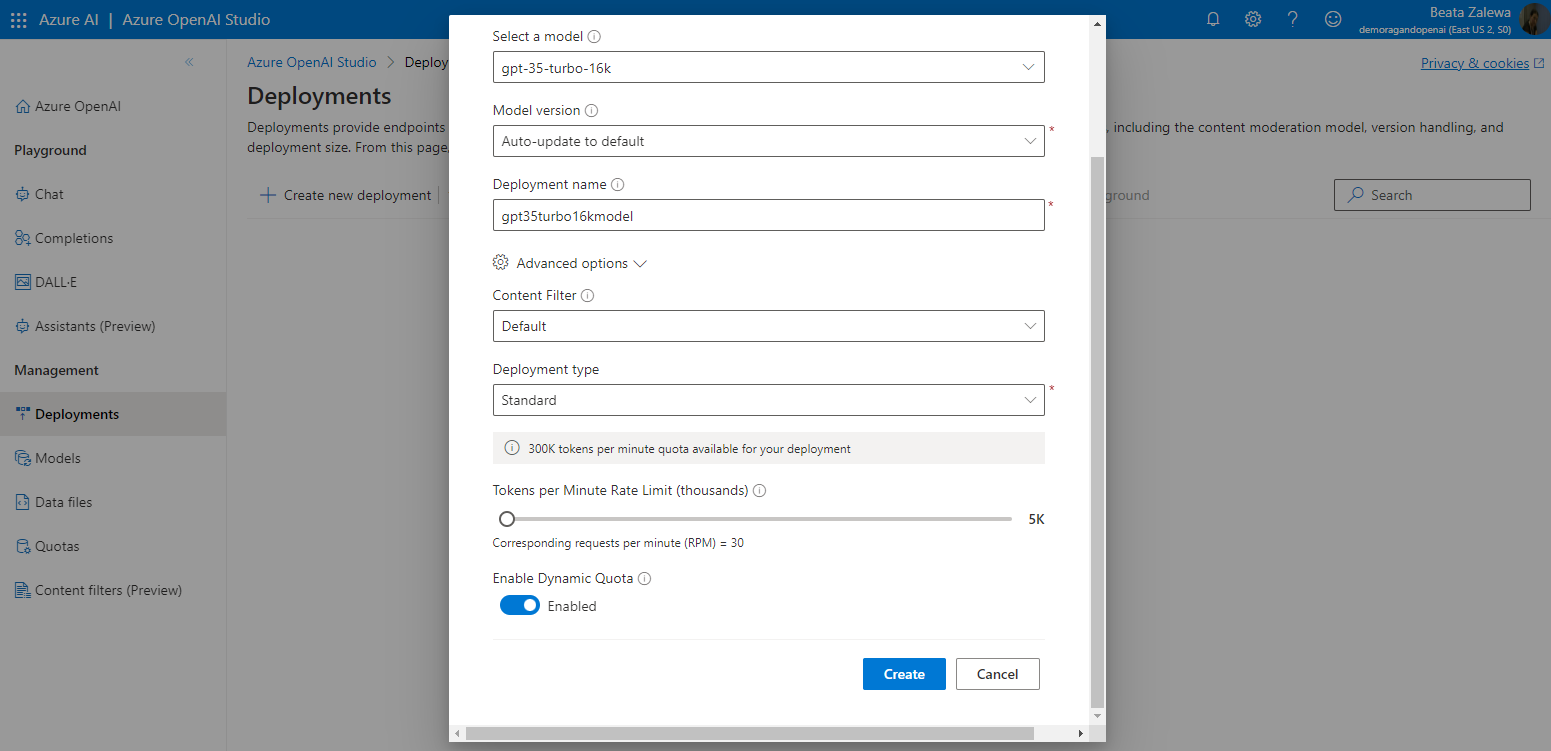
2. In Azure OpenAI Studio, on the Deployments page, if exist, view existing model deployments. If you don’t already have one, create a new deployment of the gpt-35-turbo-16k model by clicking Create new deployment with the following settings:
- Model: gpt-35-turbo-16k (must be this model to to use the features in this exercise)
- Model version: Auto-update to default
- Deployment name: A unique name of your choice. You’ll use this name later in the lab.
- Advanced options:
Content filter: Default
Deployment type: Standard
Tokens per minute rate limit: 5K*
Enable dynamic quota: Enabled
* A rate limit of 5,000 tokens per minute is more than adequate to complete this exercise while leaving capacity for other people using the same subscription.

Observe normal chat behavior without adding your own data
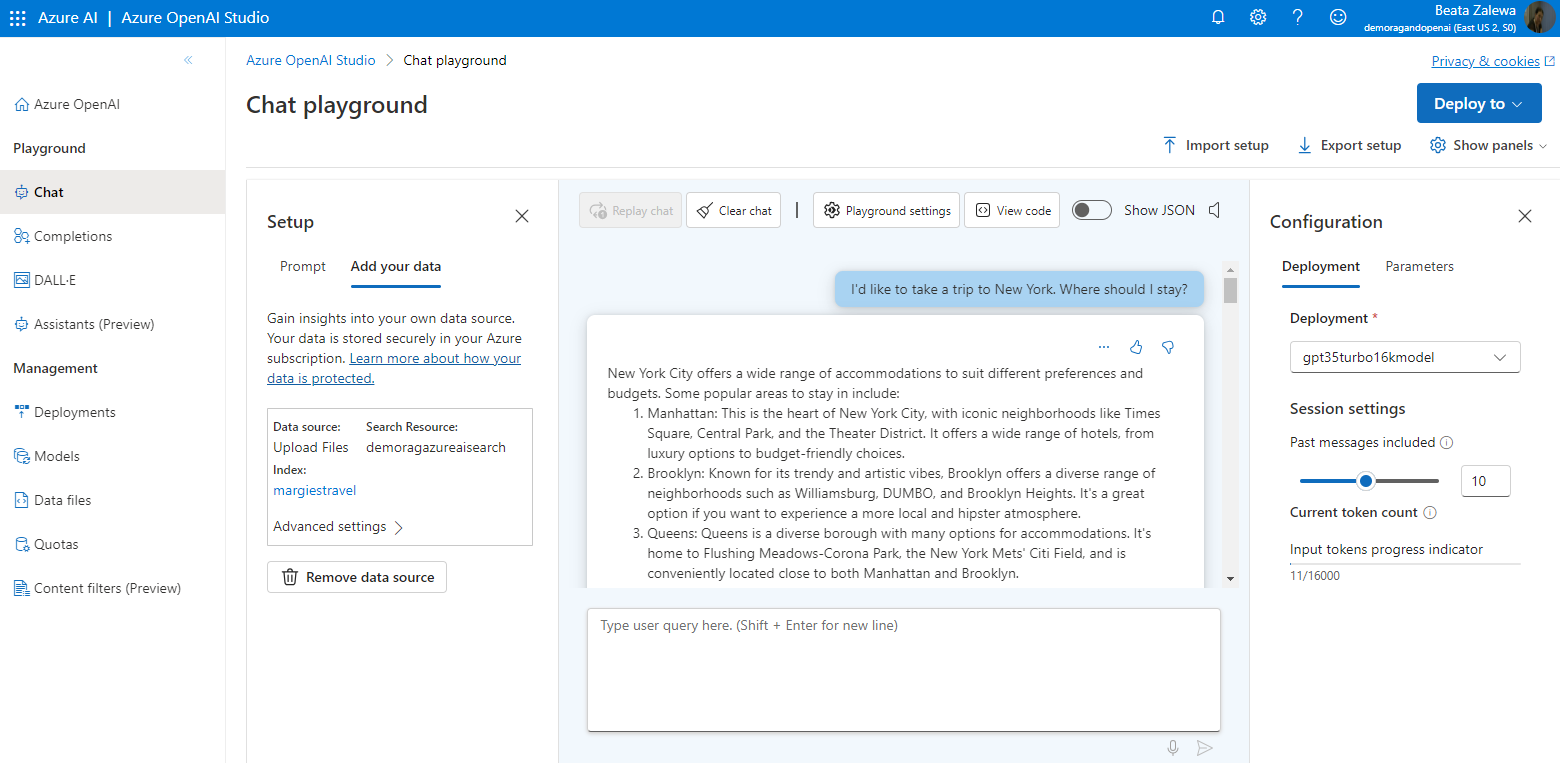
Before connecting Azure OpenAI to your data, let’s first observe how the base model responds to queries without any grounding data.
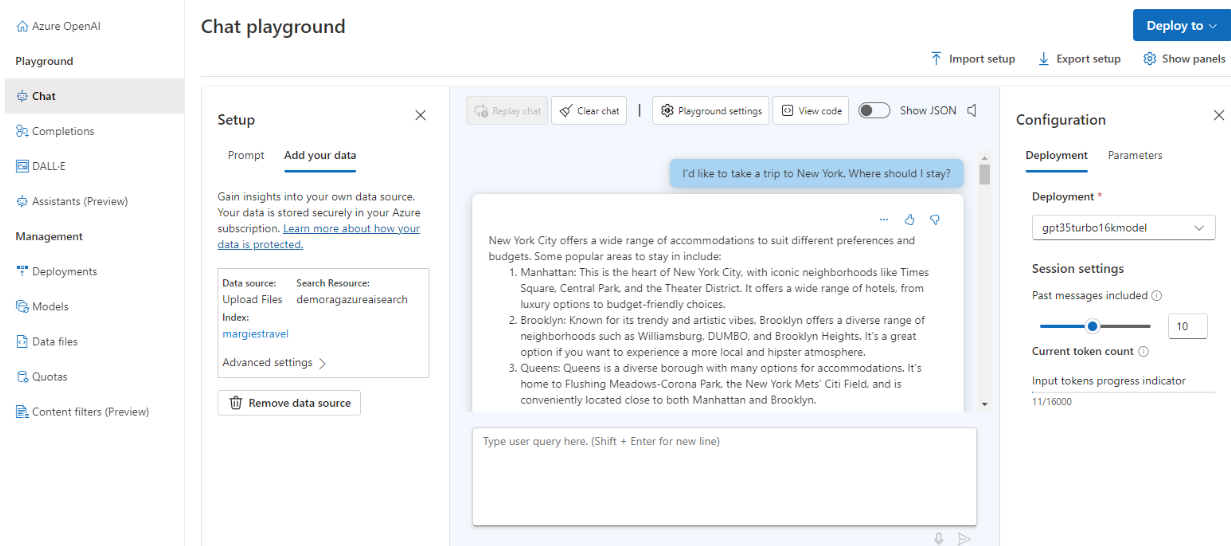
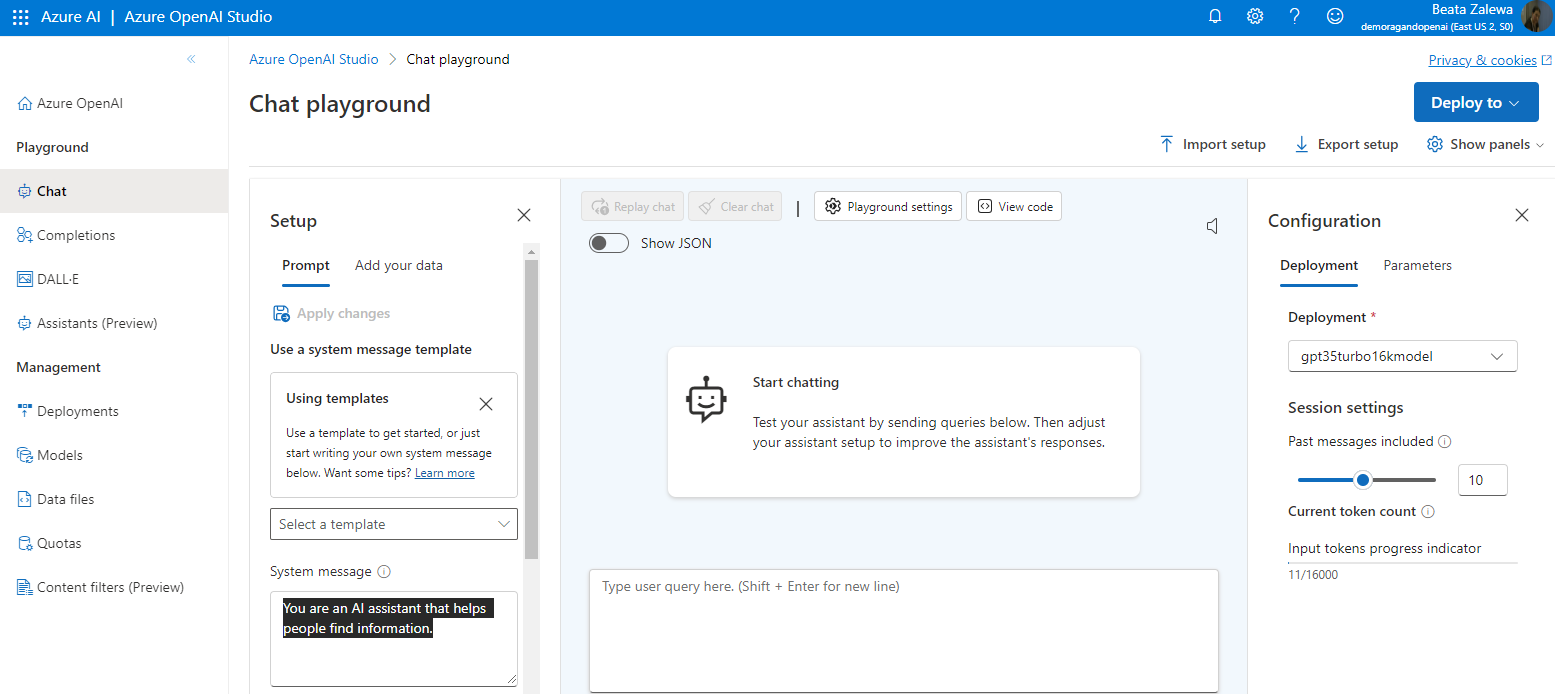
- In Azure OpenAI Studio at https://oai.azure.com, in the Playground section, select the Chat page. The Chat playground page consists of three main sections:
- Assistant setup – used to set the context for the model’s responses.
- Chat session – used to submit chat messages and view responses.
- Configuration – used to configure settings for the model deployment.
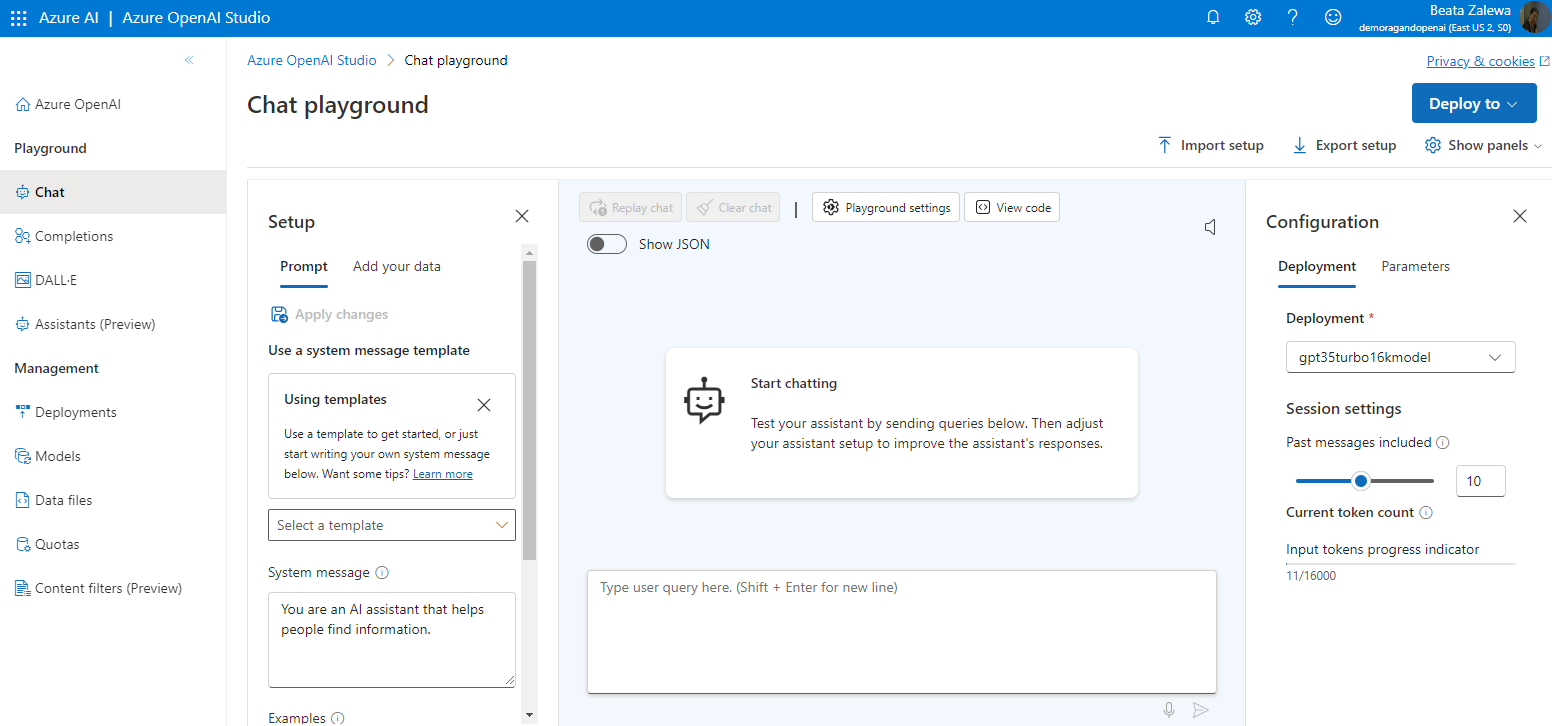
- In the Configuration section, ensure that your model deployment is selected.
- In the Assistant setup area, select the default system message template to set the context for the chat session. The default system message is You are an AI assistant that helps people find information.
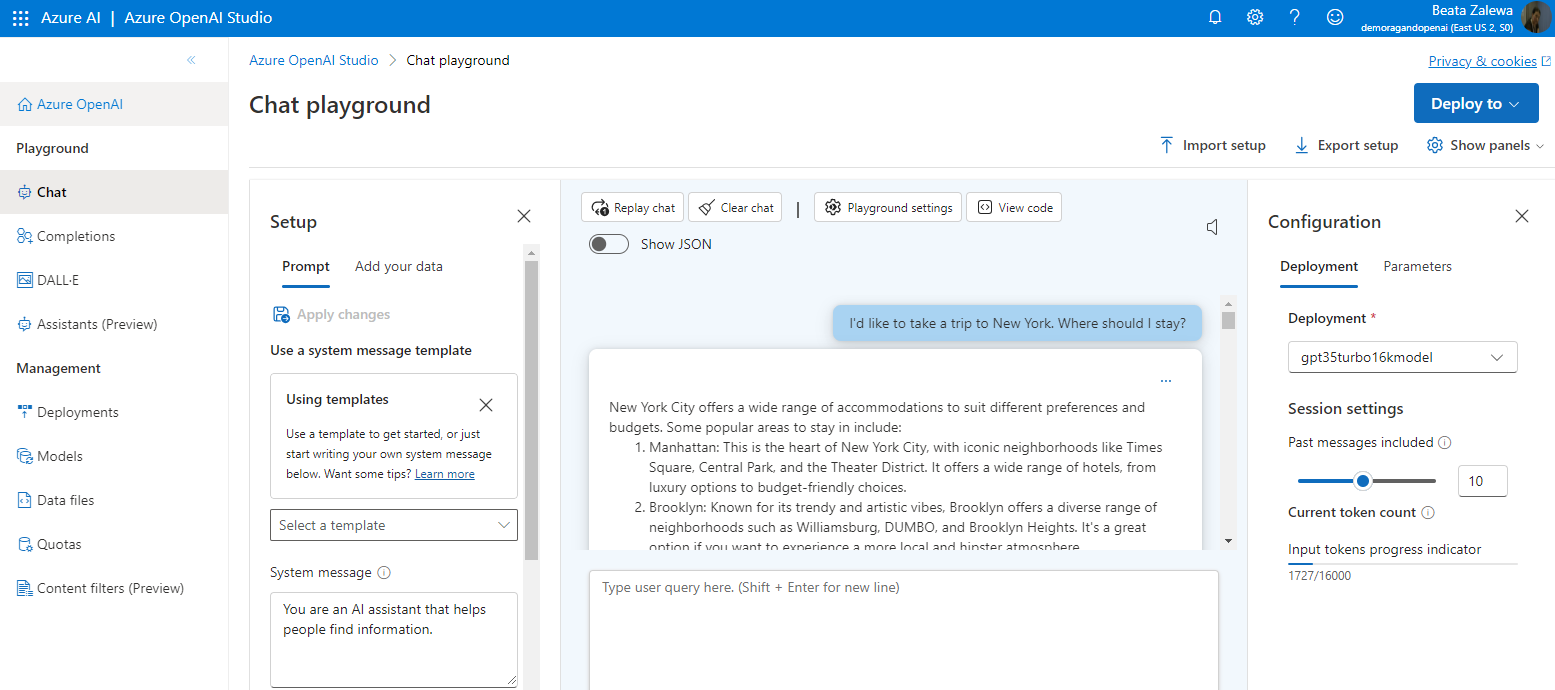
- In the Chat session, submit the following queries, and review the responses:
I’d like to take a trip to New York. Where should I stay?
What are some facts about New York?
Try similar questions about tourism and places to stay for other locations that will be included in our grounding data, such as London, or San Francisco. You’ll likely get complete responses about areas or neighborhoods, and some general facts about the city.
Connect your data in the chat playground
Bow you’ll add some data for a fictional travel agent company named Margie’s Travel. Then you’ll see how the Azure openAI model responds when using the brochures from Margie’s Travel as grounding data.
- In a new browser tab, download an archive of brochure data from https://aka.ms/own-data-brochures. Extract the brochures to a folder on your PC.

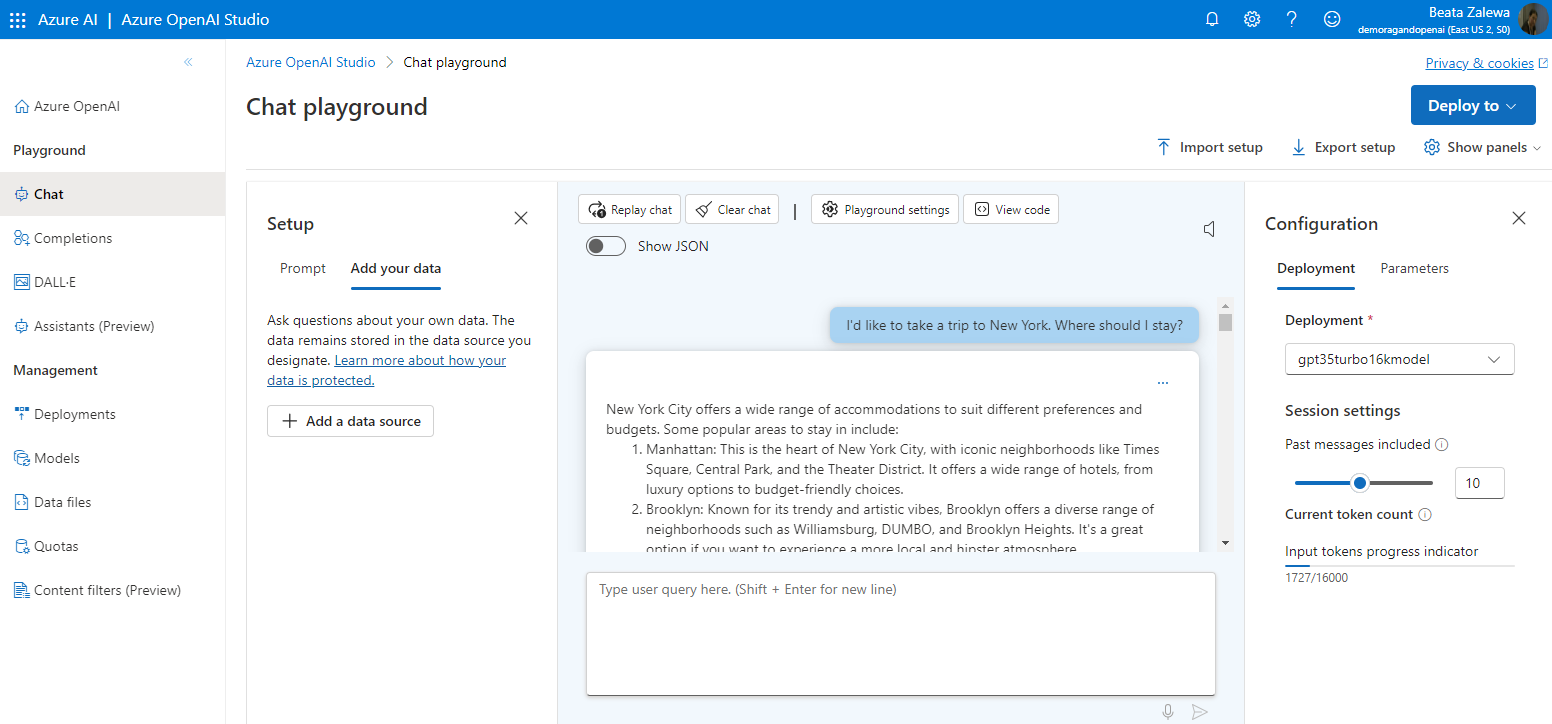
- In Azure OpenAI Studio, in the Chat playground, in the Assistant setup section, select Add your data.
- Select Add a data source.
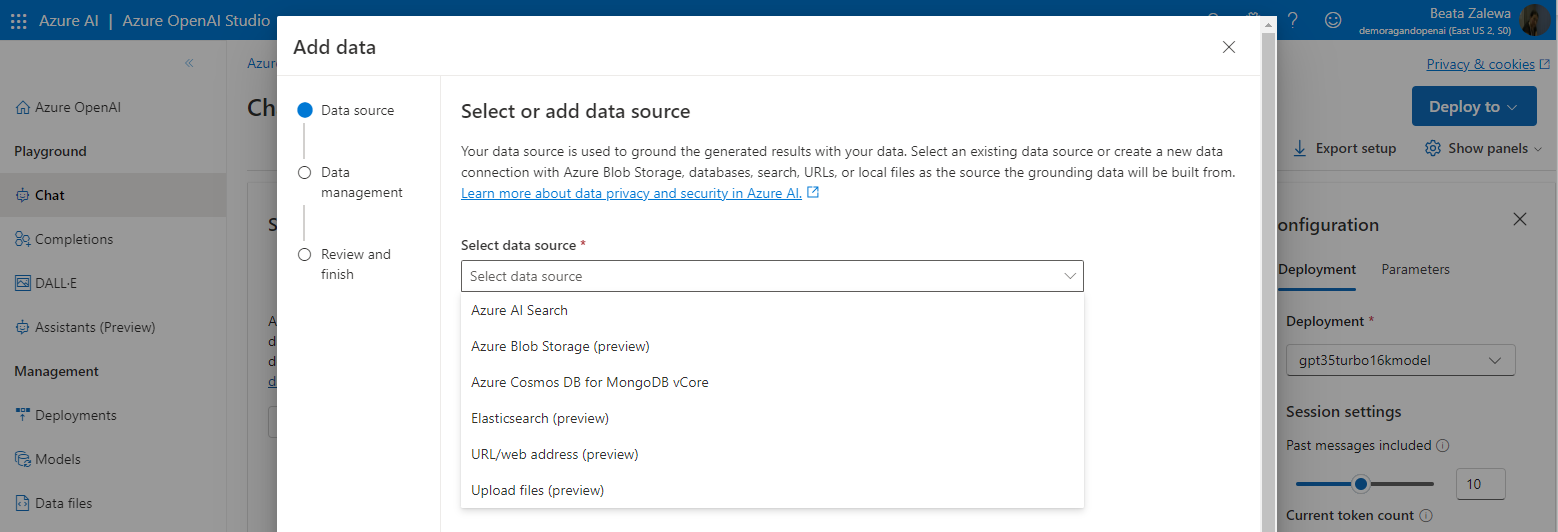
4. Choose Upload files (preview).
5. You’ll need to create a storage account and Azure AI Search resource.
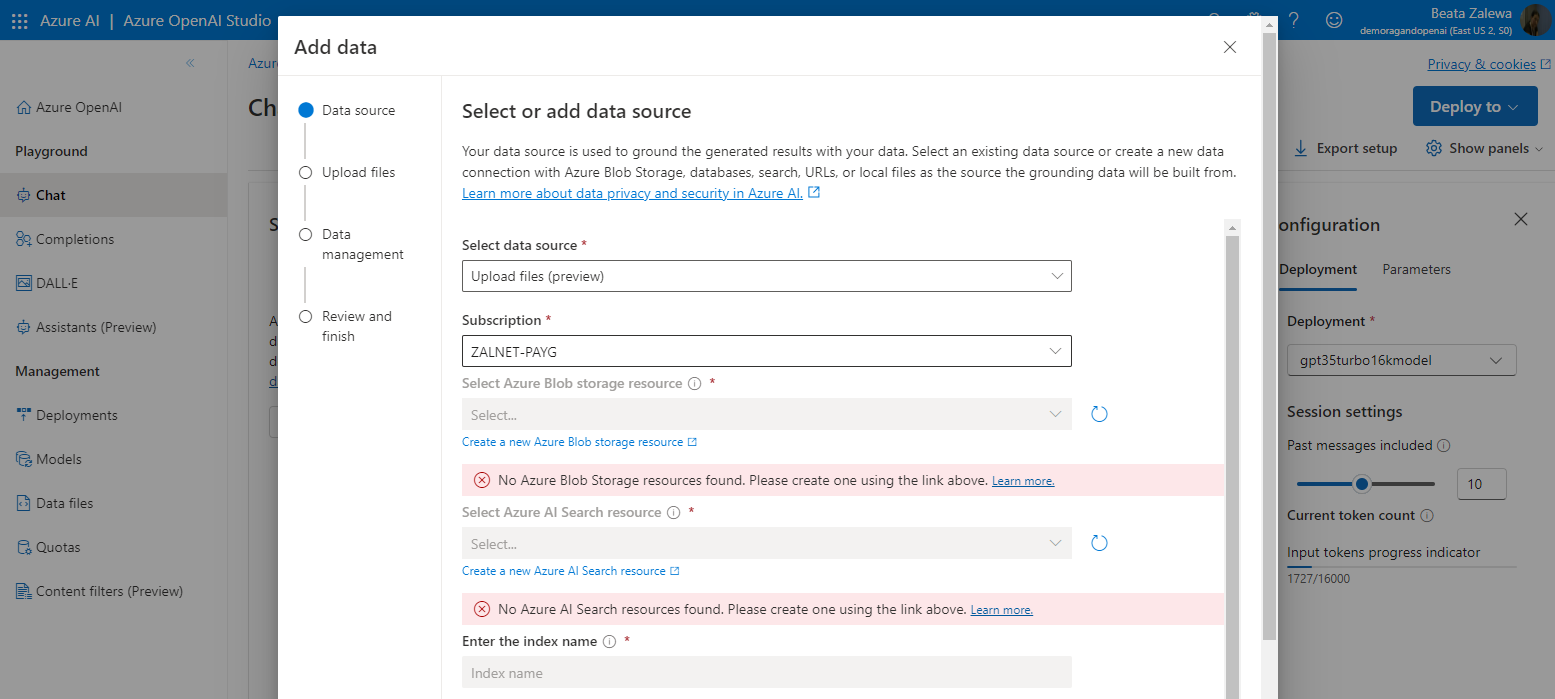
6. Under the dropdown for the storage resource, select Create a new Azure Blob storage resource, and create a storage account with the following settings. Anything not specified leave as the default.
- Subscription: Your Azure subscription
- Resource group: Select the same resource group as your Azure OpenAI resource
- Storage account name: Enter a unique name
- Region: Select the same region as your Azure OpenAI resource
- Redundancy: Locally-redundant storage (LRS)
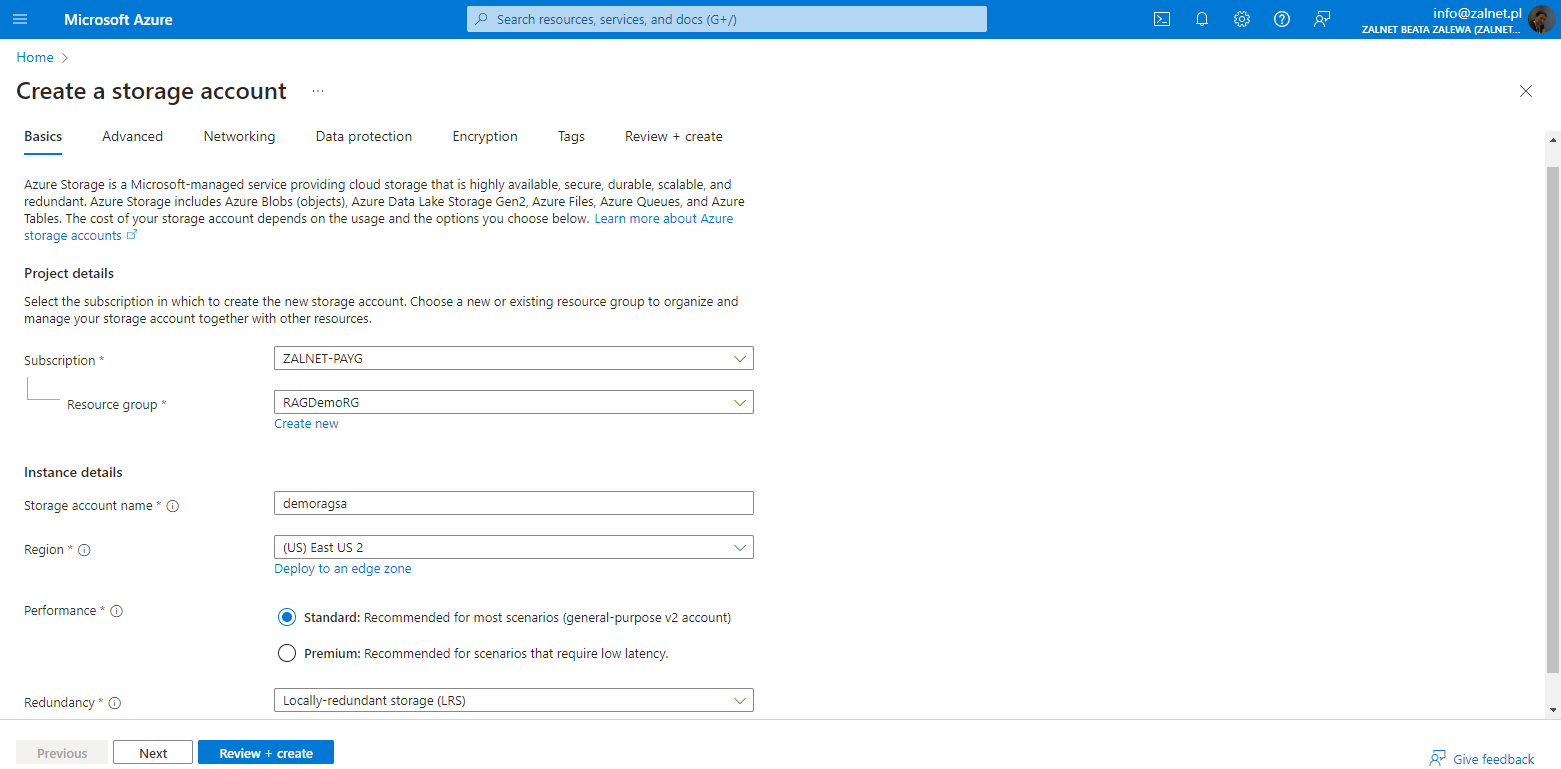
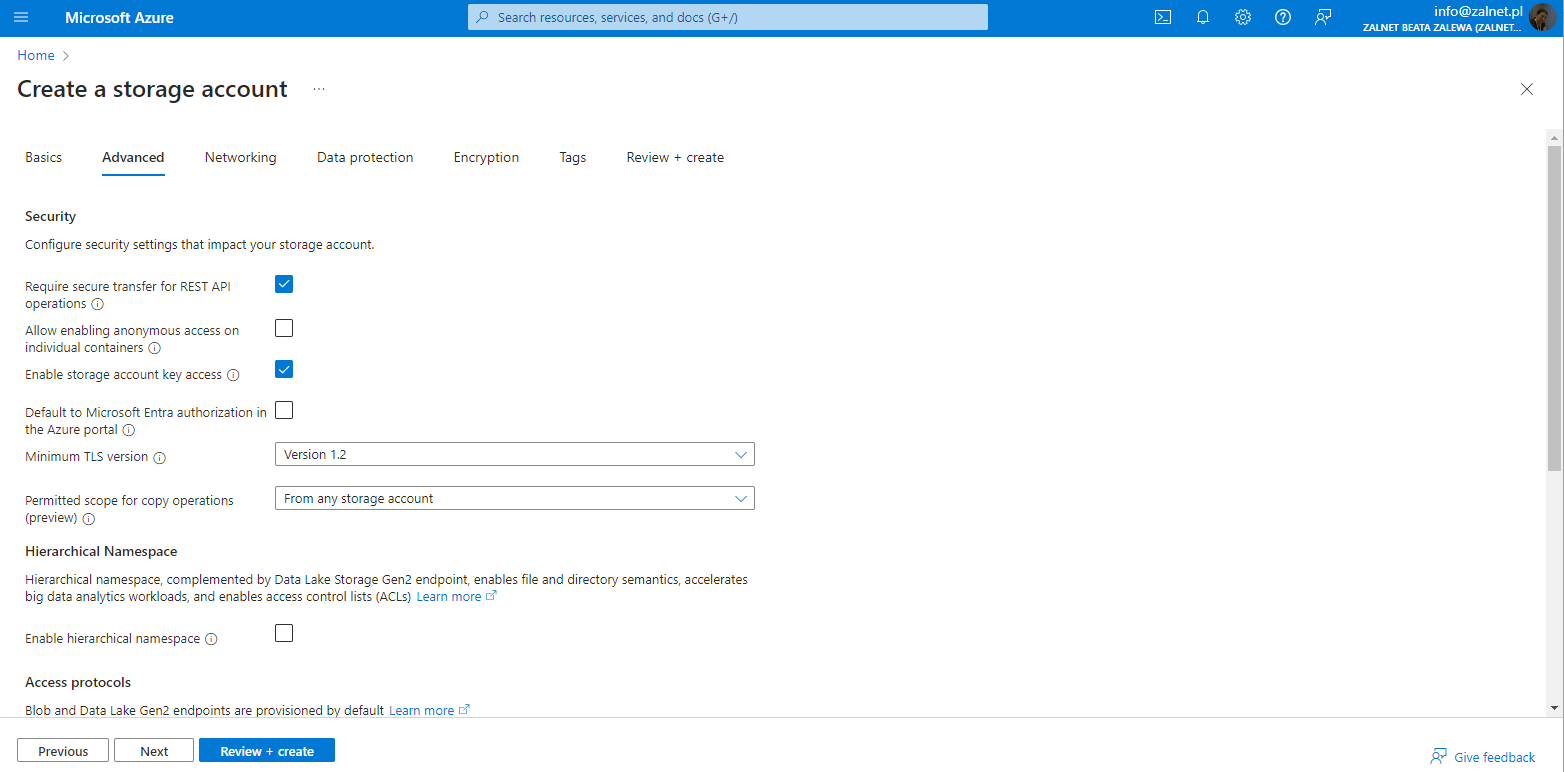
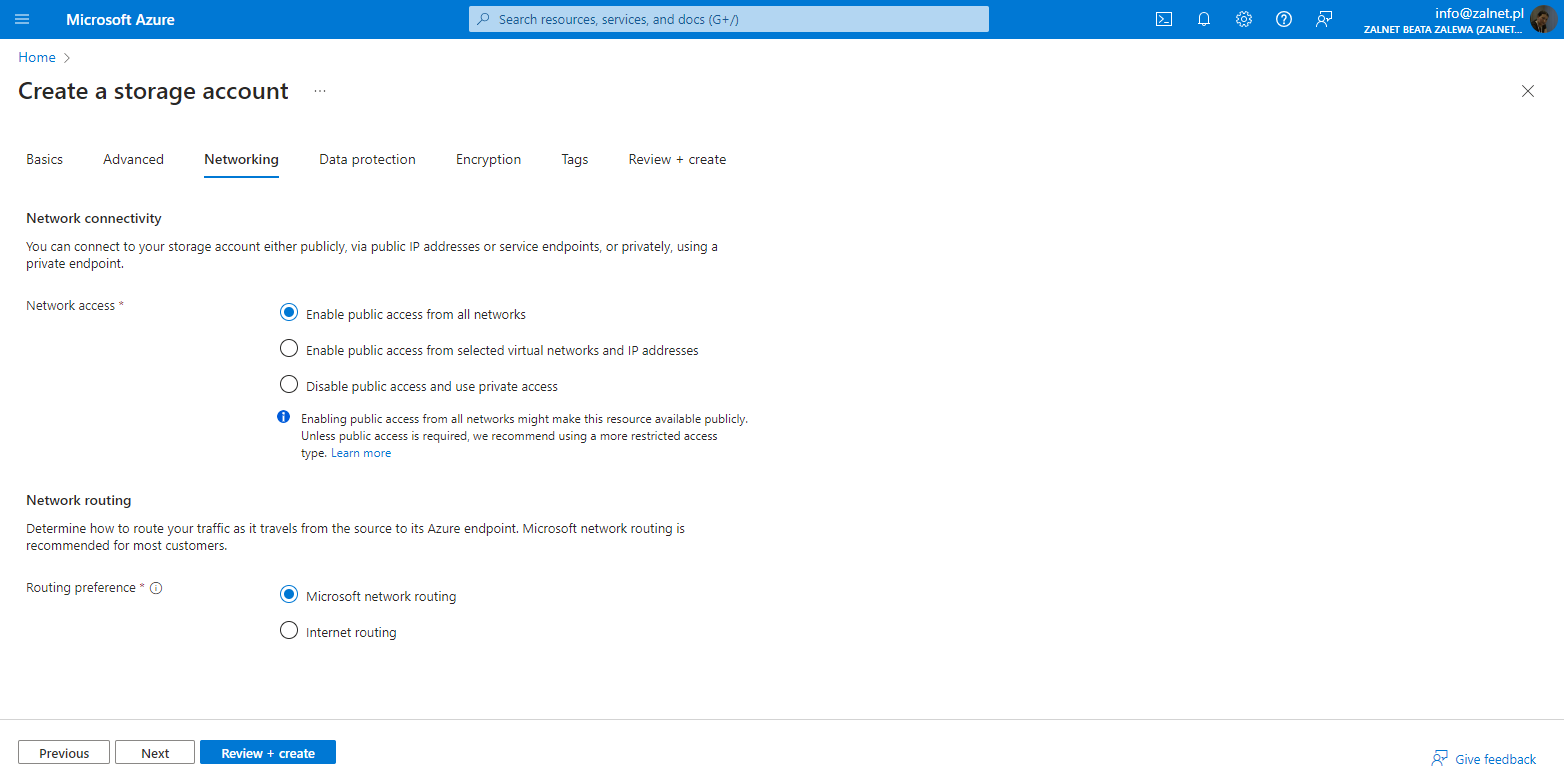
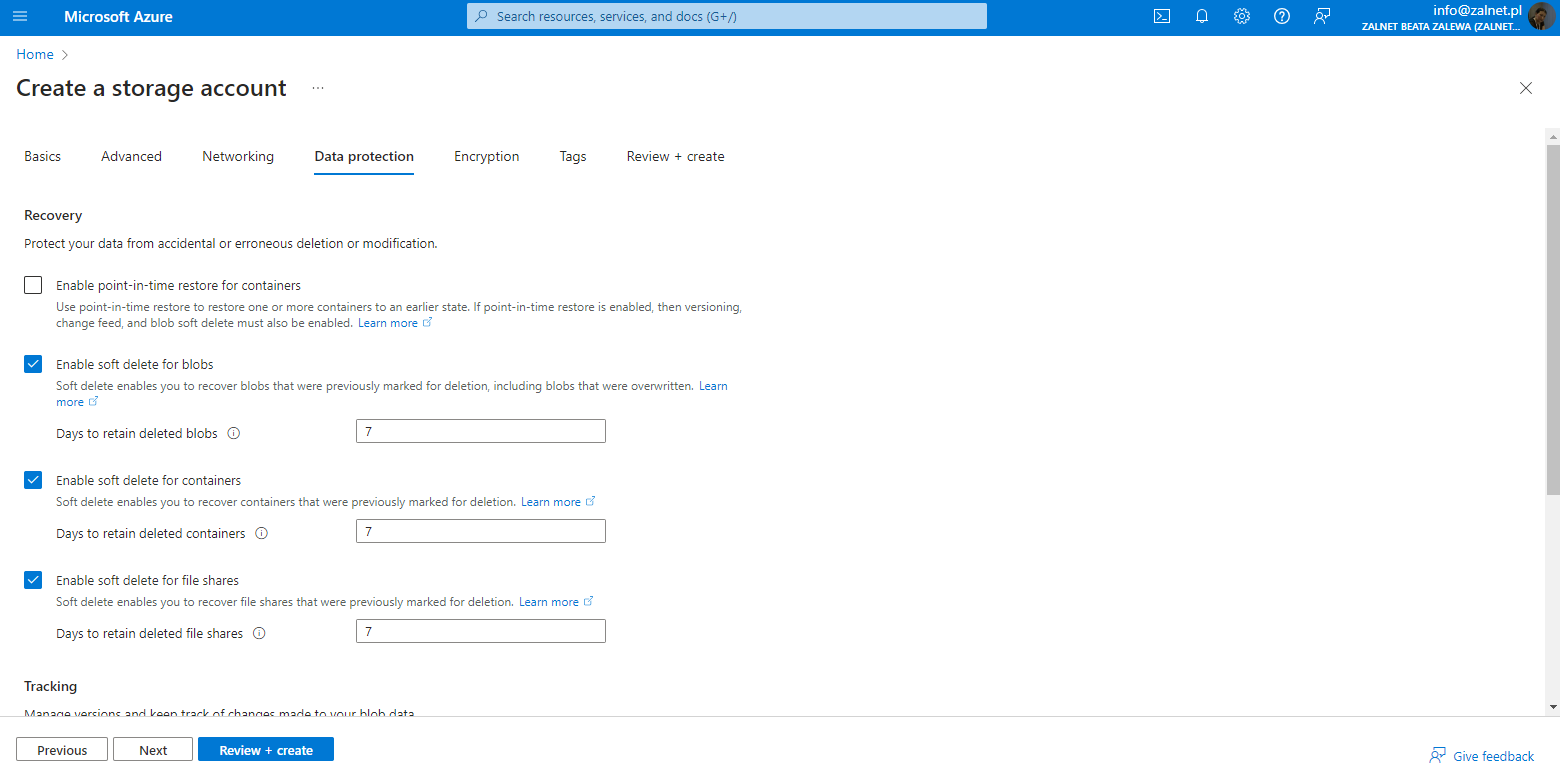
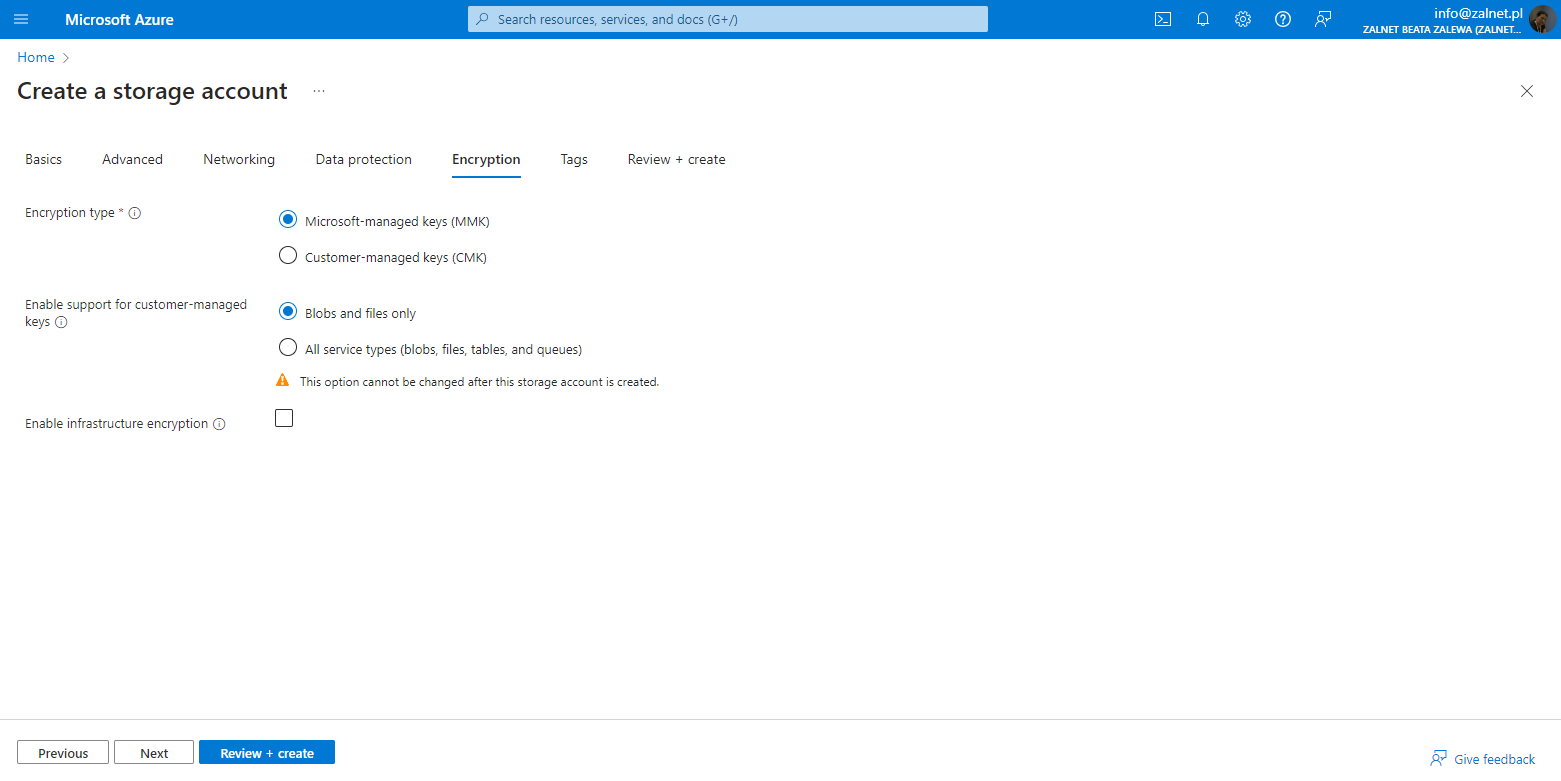
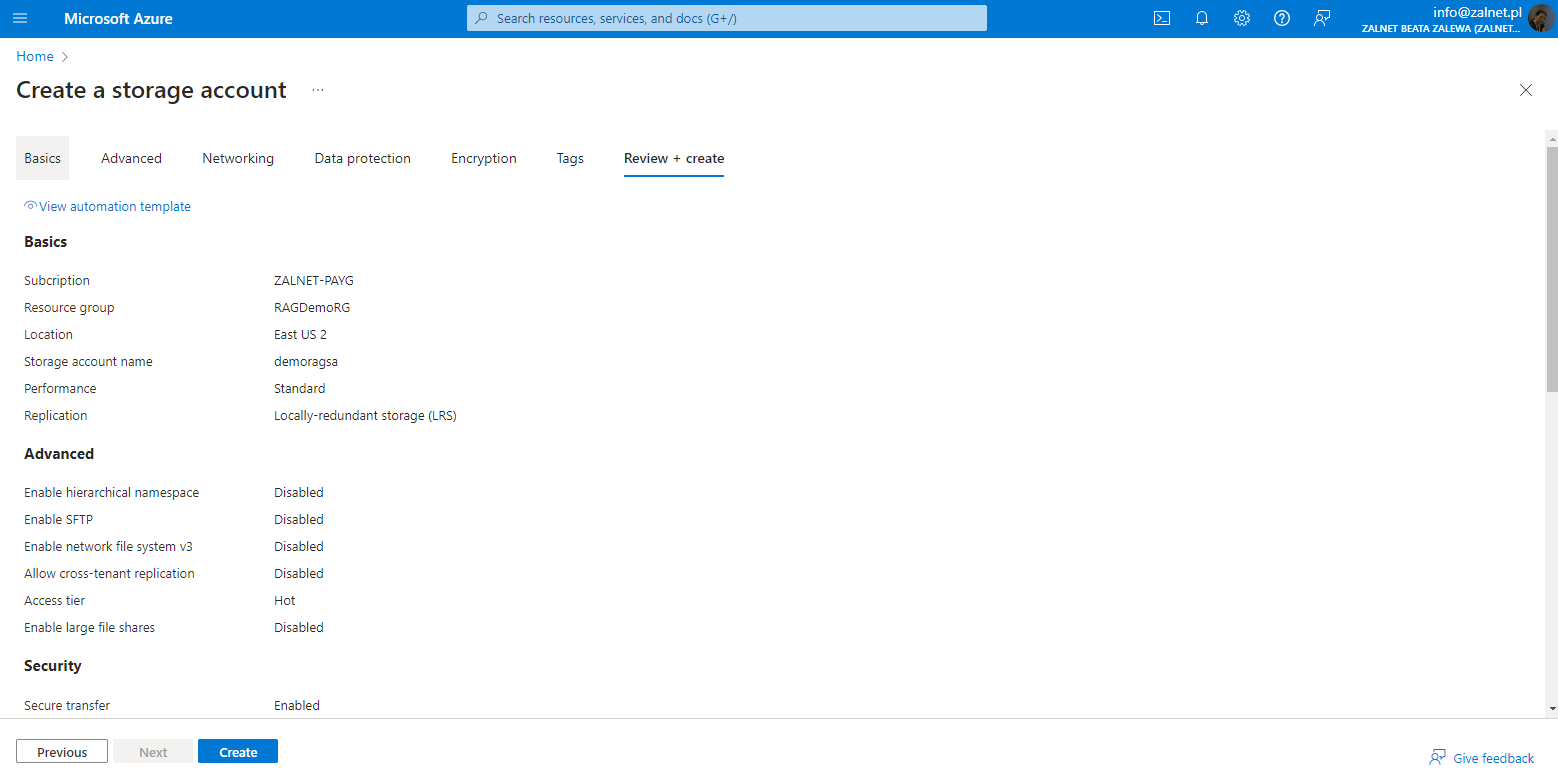

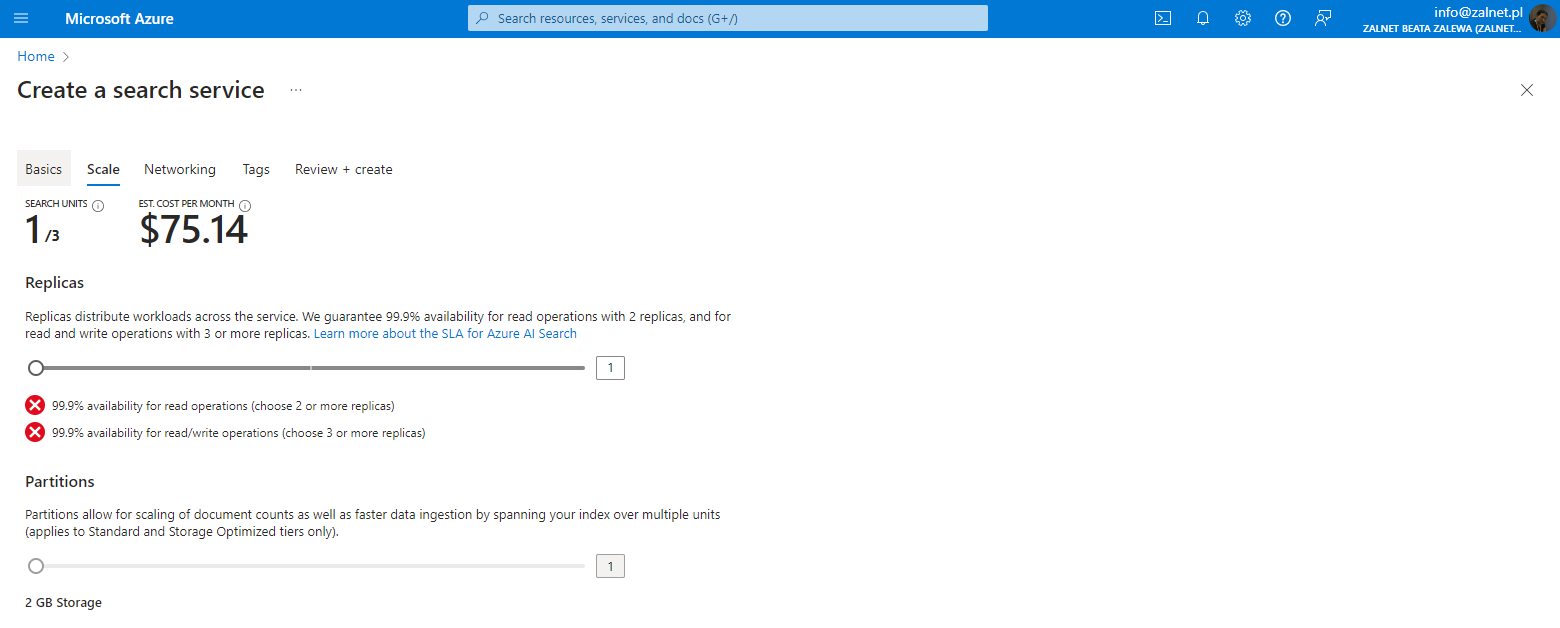
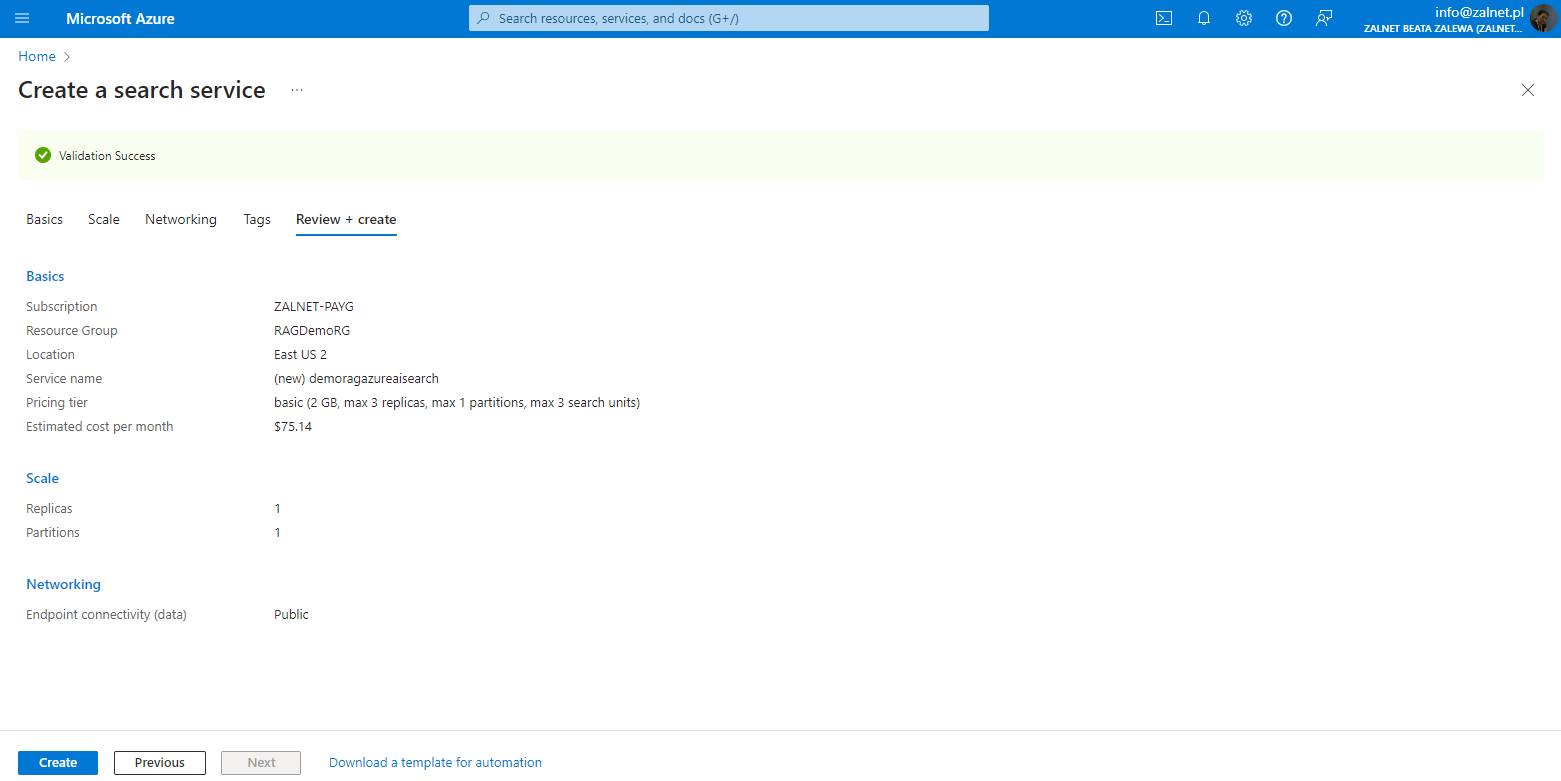
7. While the storage account resource is being created, return to Azure OpenAI Studio and select Create a new Azure AI Search resource with the following settings. Anything not specified leave as the default.
- Subscription: Your Azure subscription
- Resource group: Select the same resource group as your Azure OpenAI resource
- Service name: Enter a unique name
- Location: Select the same location as your Azure OpenAI resource
- Pricing tier: Basic
8. Wait until your search resource has been deployed, then switch back to the Azure AI Studio.
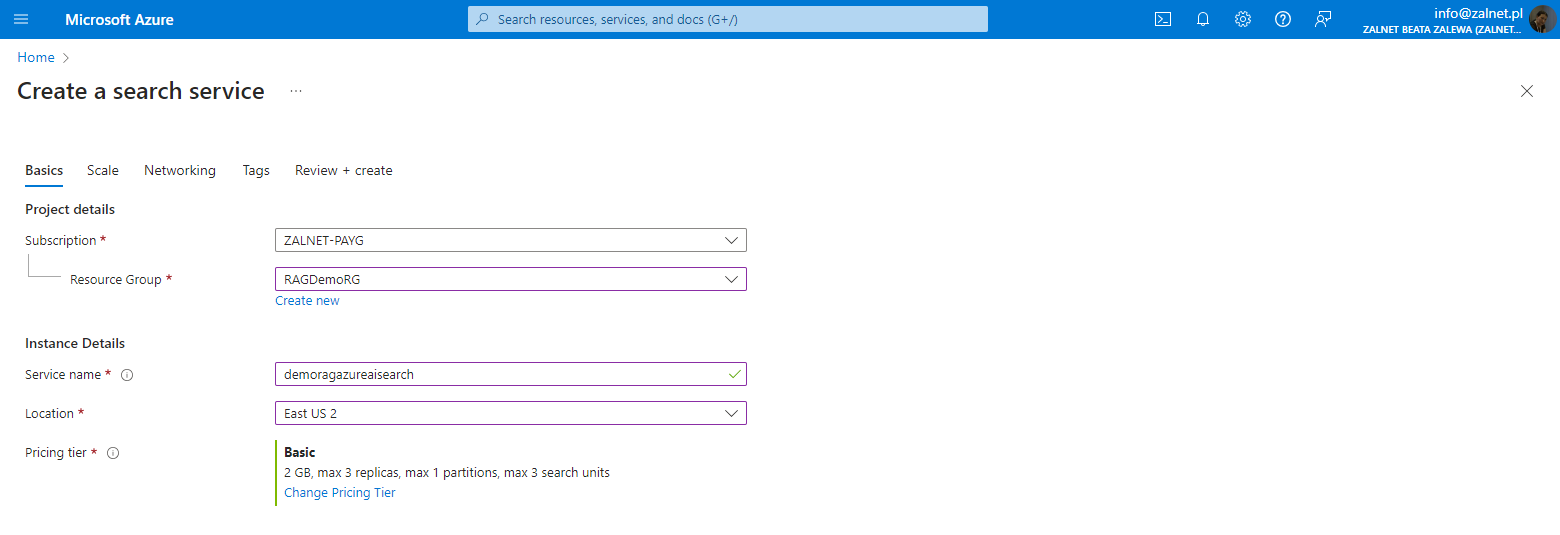


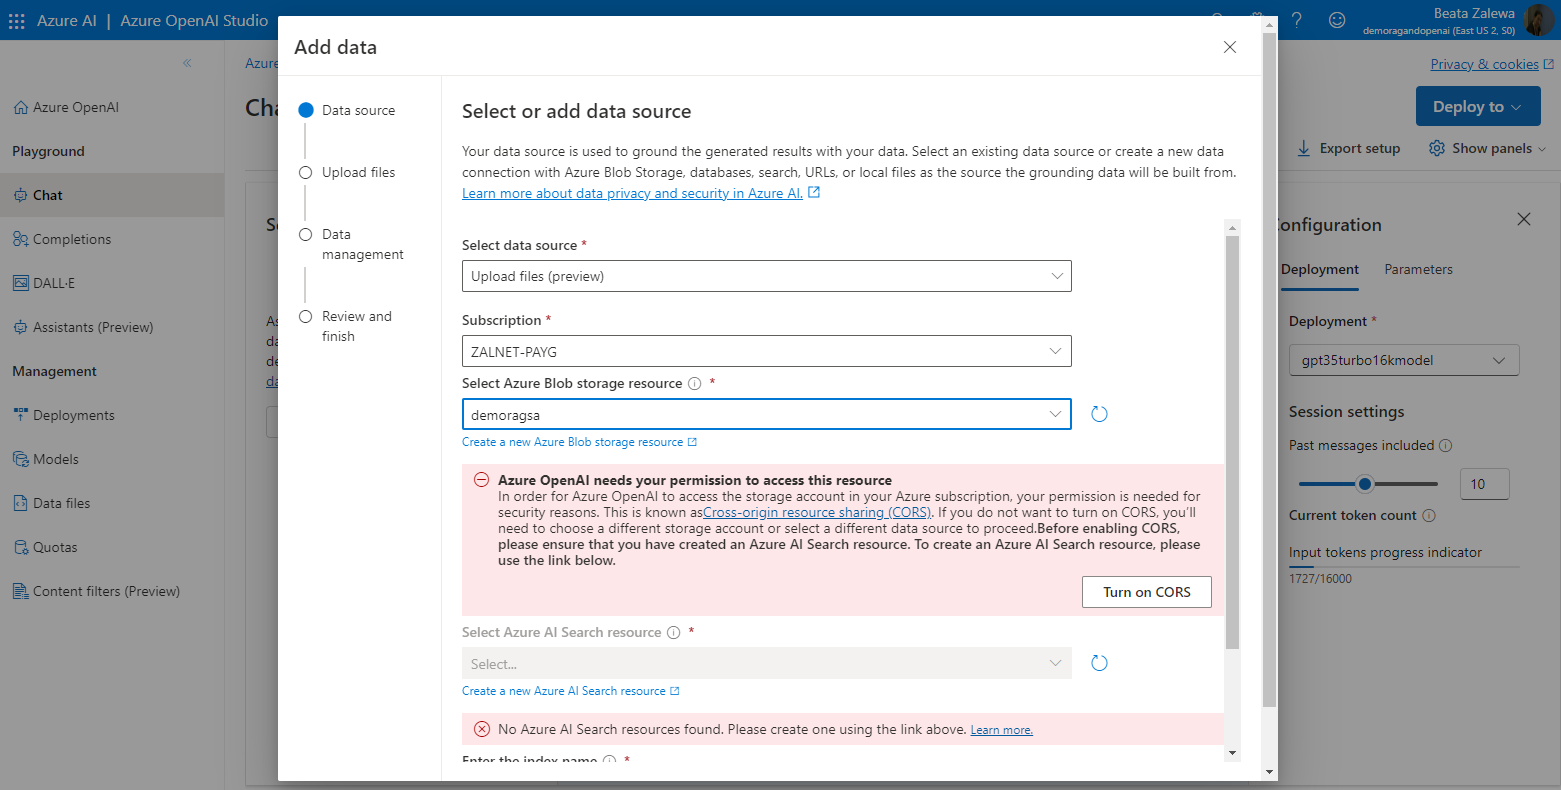
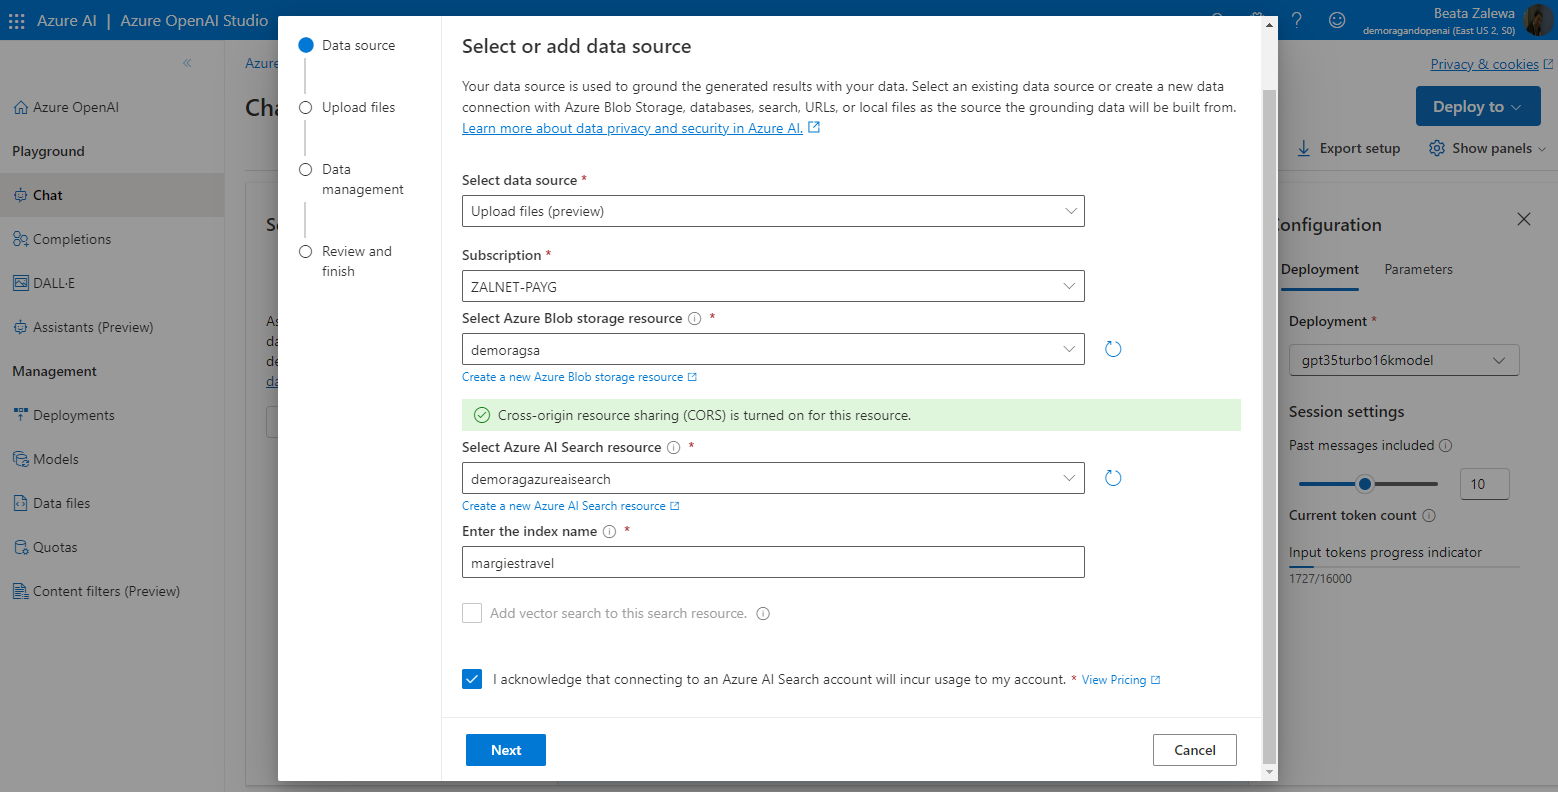
9. In the Add data, enter the following values for your data source, then select Next.
- Select data source: Upload files
- Subscription: Your Azure subscription
- Select Azure Blob storage resource: Use the Refresh button to repopulate the list, and then choose the storage resource you created
- Turn on CORS when prompted
- Select Azure AI Search resource: Use the Refresh button to repopulate the list, and then choose the search resource you created
- Enter the index name: margiestravel
- Add vector search to this search resource: unchecked
- I acknowledge that connecting to an Azure AI Search account will incur usage to my account : checked
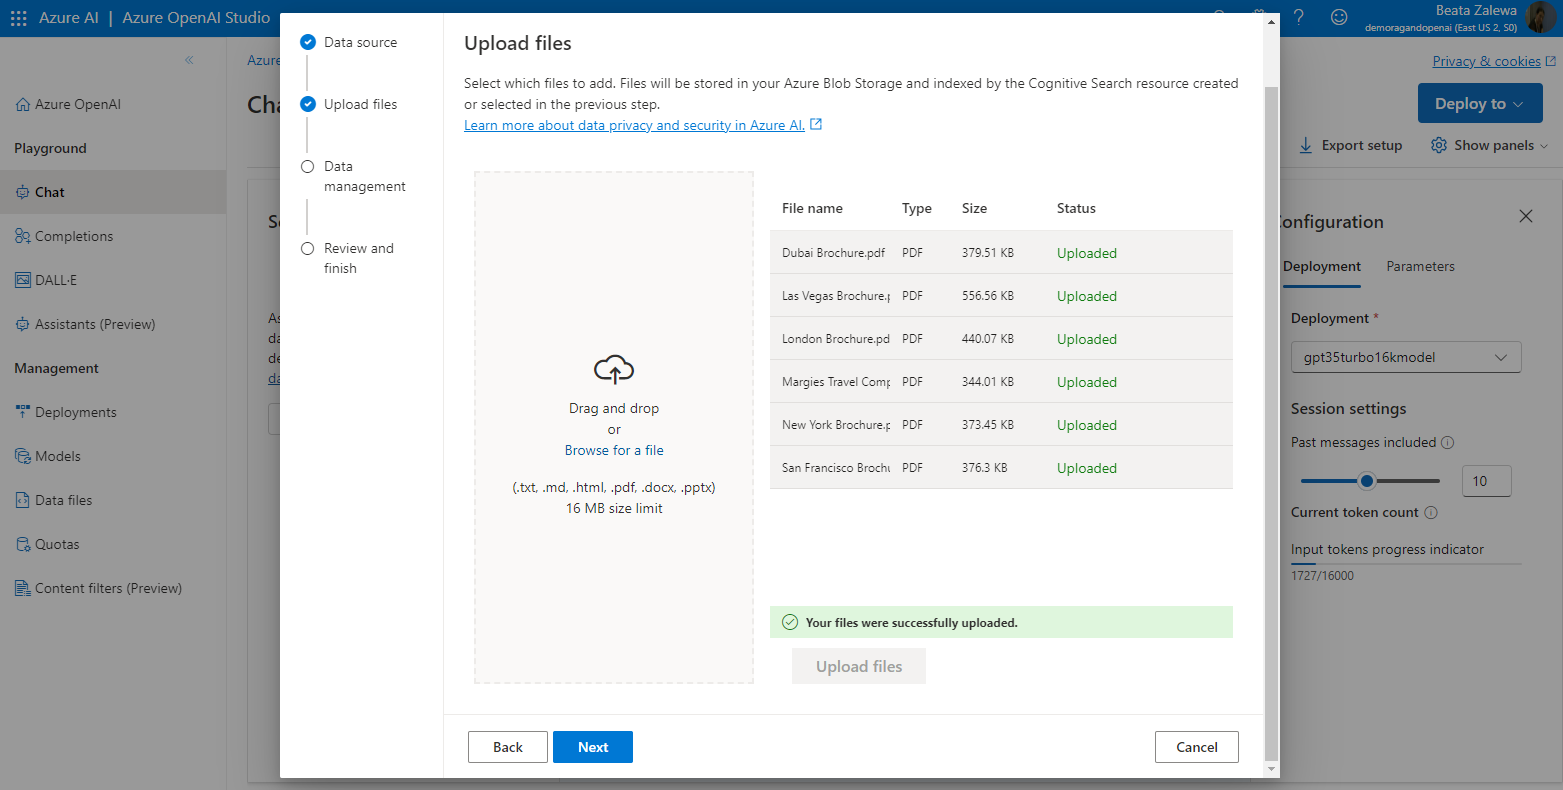
10. On the Upload files page, upload the PDFs you downloaded, and then select Next.
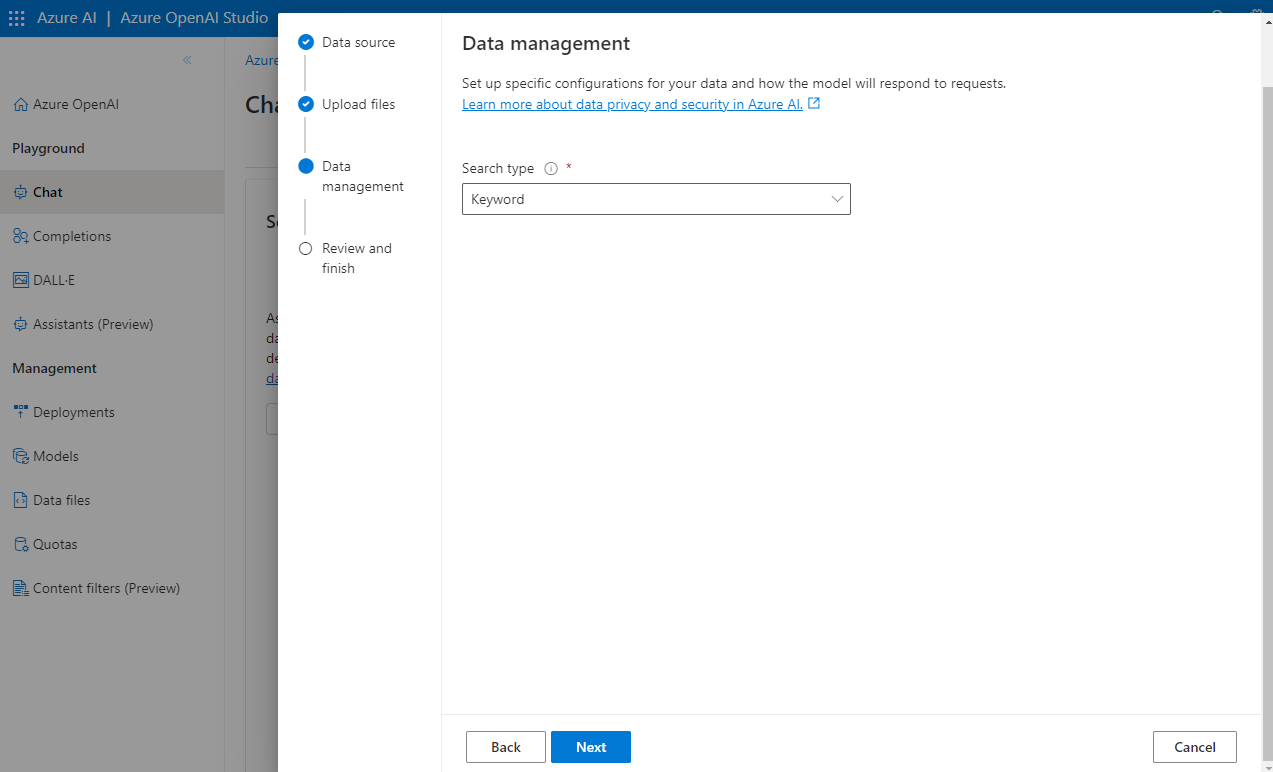
11. On the Data management page select the Keyword search type from the drop-down, and then select Next.
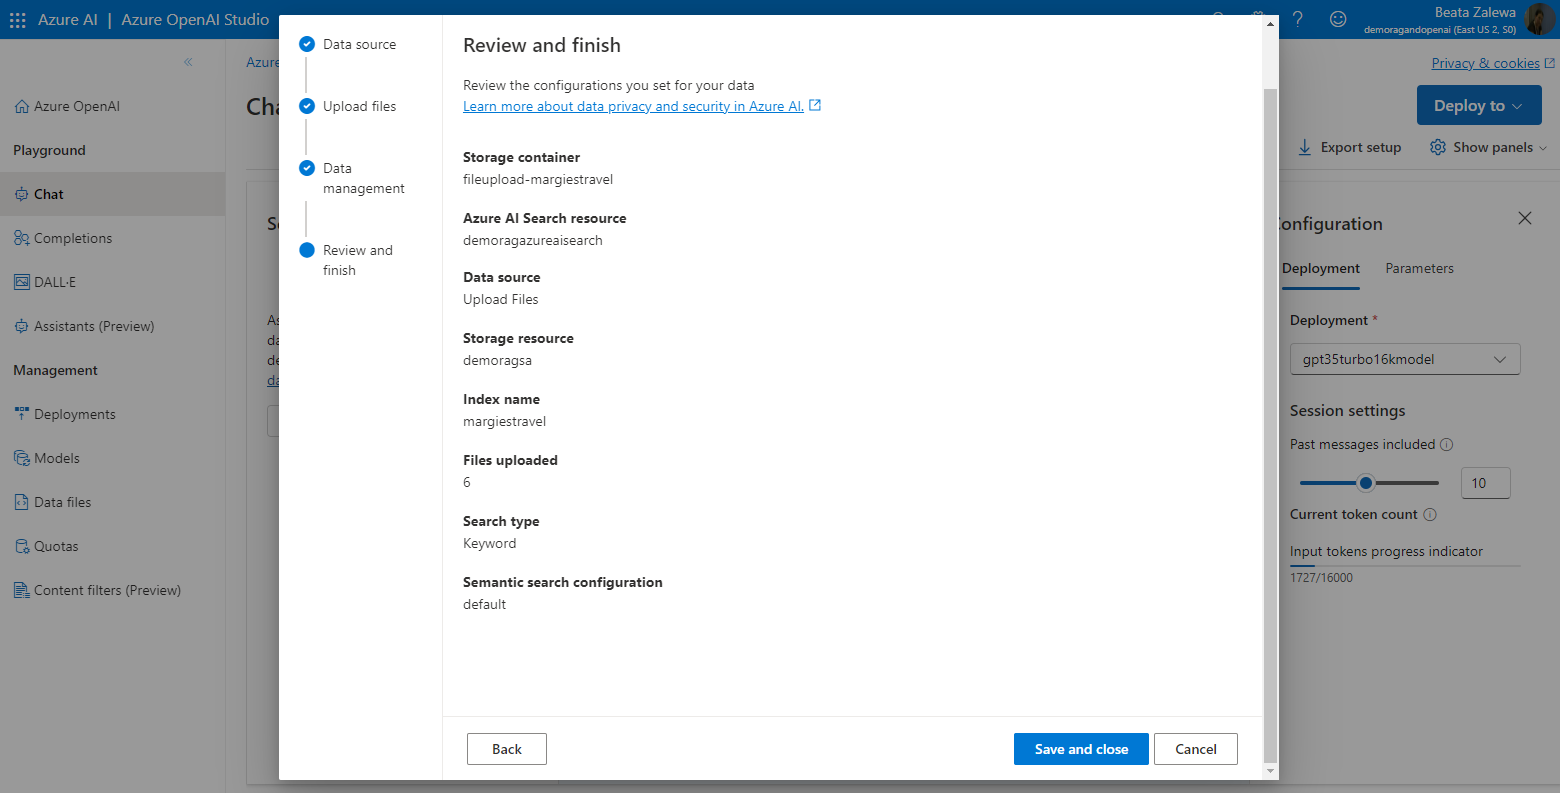
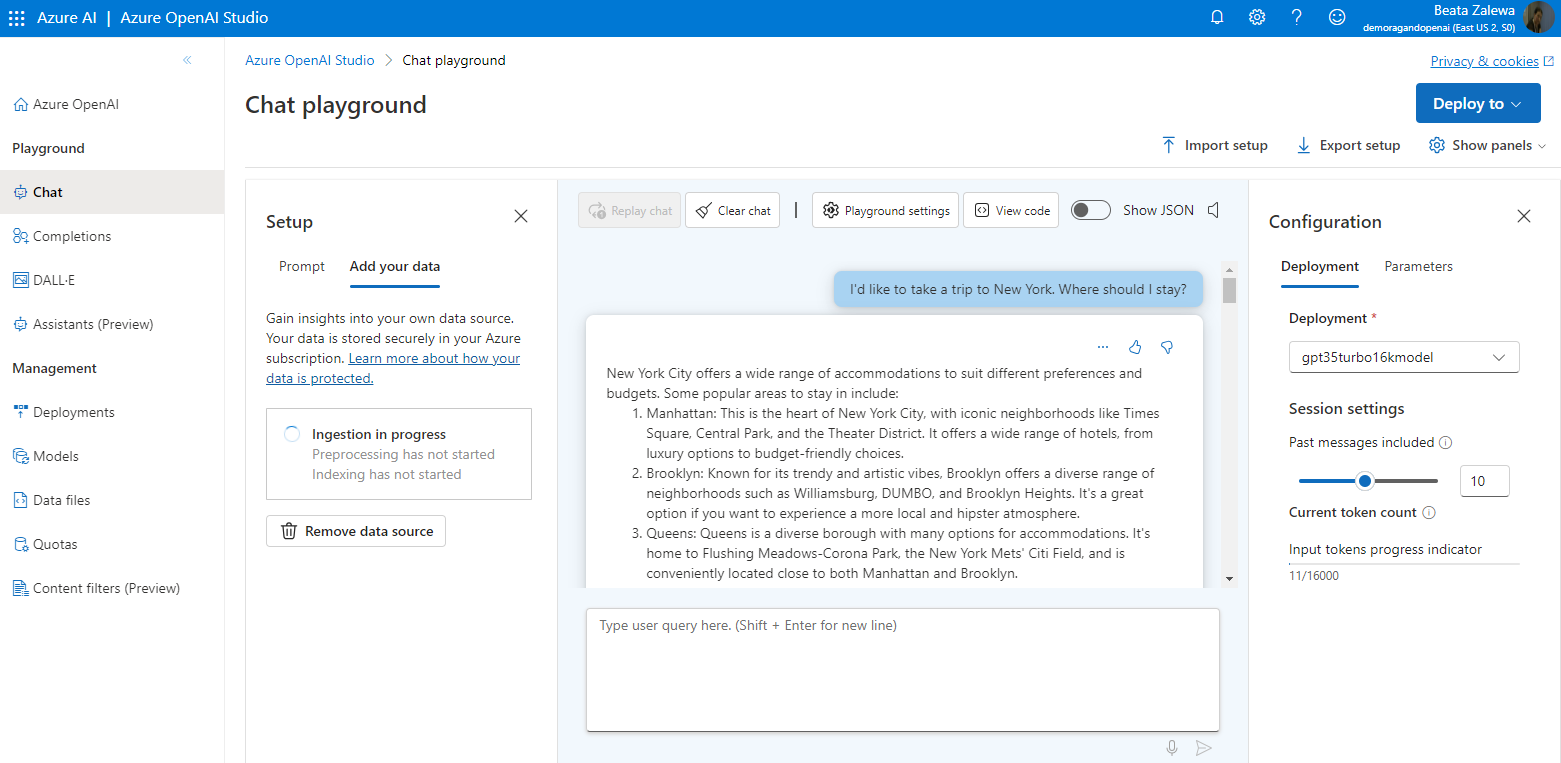
12. On the Review and finish page select Save and close, which will add your data. This may take a few minutes, during which you need to leave your window open. Once complete, you’ll see the data source, search resource, and index specified in the Assistant setup section.
Tip: Occasionally the connection between your new search index and Azure OpenAI Studio takes too long. If you’ve waited for a few minutes and it still hasn’t connected, check your AI Search resources in Azure portal. If you see the completed index, you can disconnect the data connection in Azure OpenAI Studio and re-add it by specifying an Azure AI Search data source and selecting your new index.
Chat with a model grounded in your data
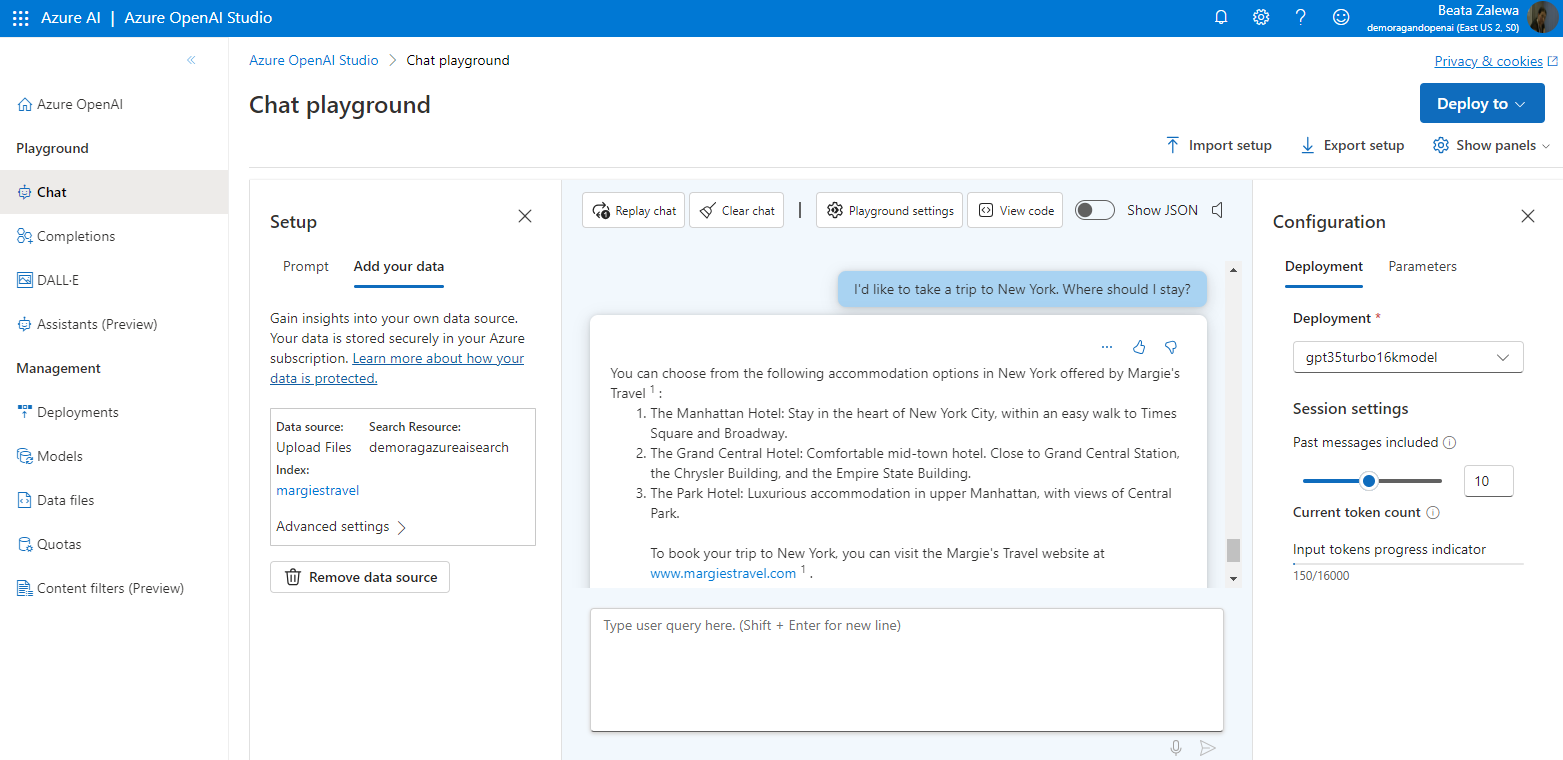
Now that you’ve added your data, ask the same questions as you did previously, and see how the response differs.
I’d like to take a trip to New York. Where should I stay?
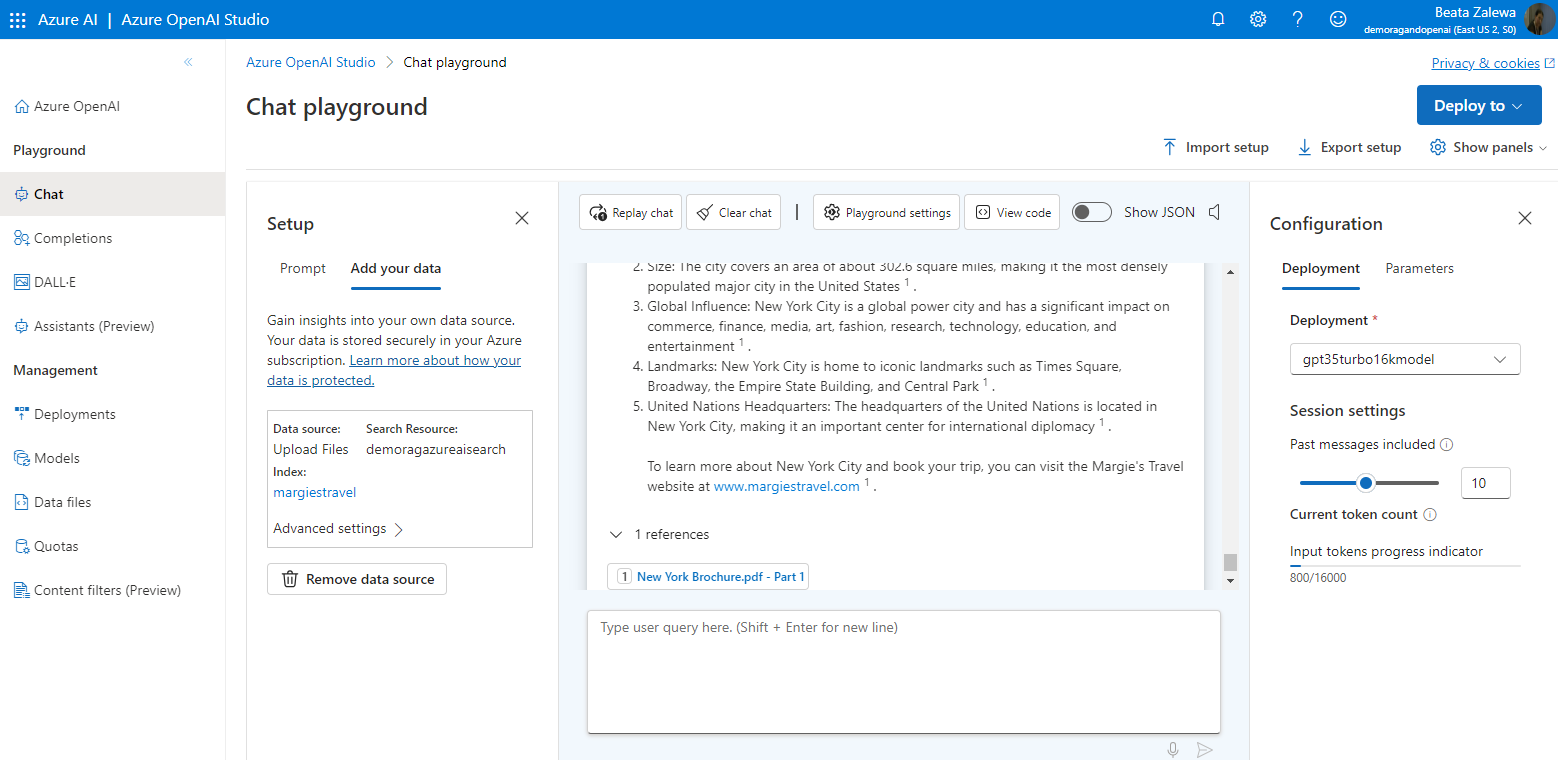
What are some facts about New York?
You’ll notice a very different response this time, with specifics about certain hotels and a mention of Margie’s Travel, as well as references to where the information provided came from. If you open the PDF reference listed in the response, you’ll see the same hotels as the model provided.
Try asking it about other cities included in the grounding data, which are Dubai, Las Vegas, London, and San Francisco.
Note: Add your data is still in preview and might not always behave as expected for this feature, such as giving the incorrect reference for a city not included in the grounding data.
Connect your app to your own data
Next, let’s explore how to connect your app to use your own data.
Prepare to develop an app in Visual Studio Code
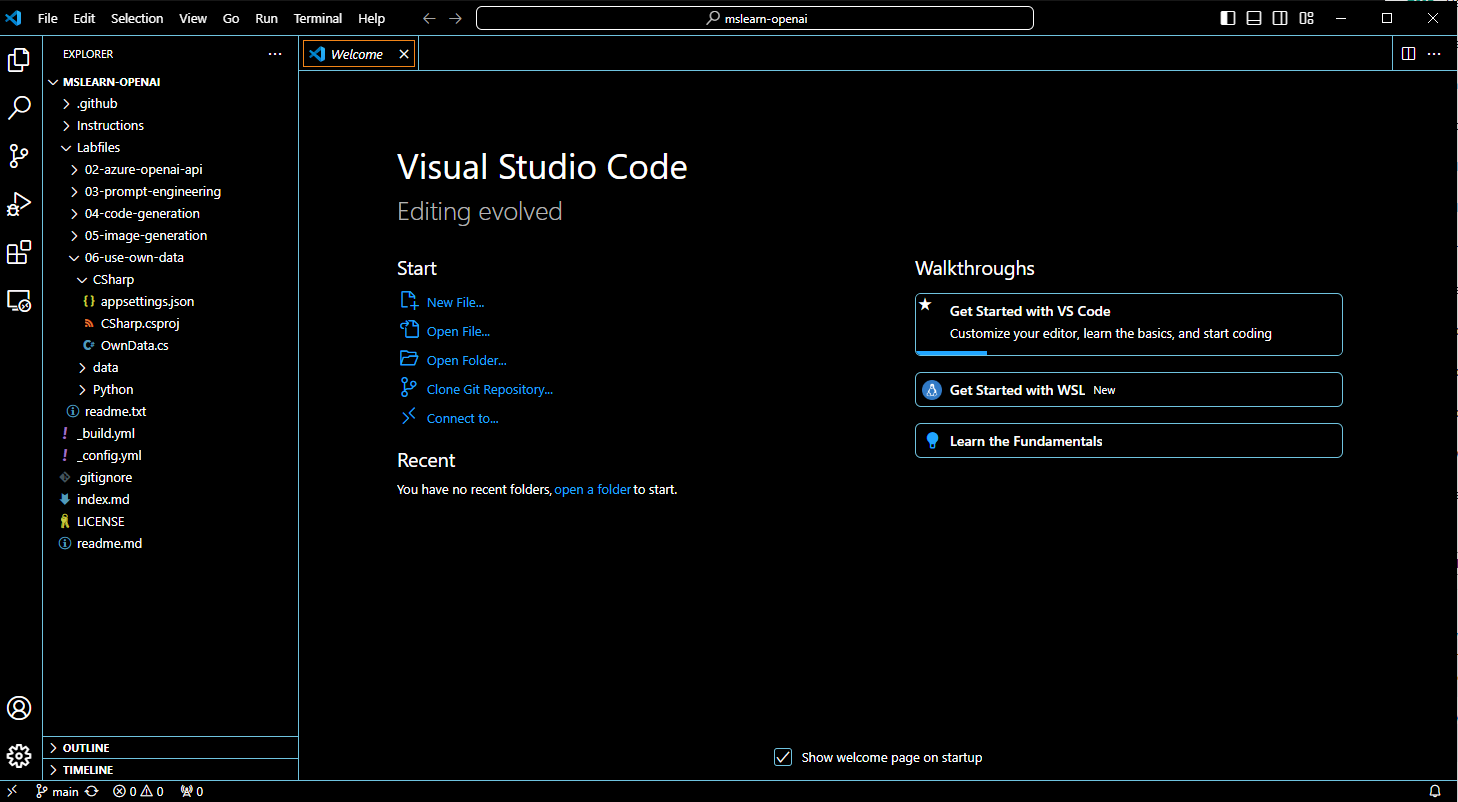
- Start Visual Studio Code.
- Open the palette (SHIFT+CTRL+P) and run a Git: Clone command to clone the https://github.com/MicrosoftLearning/mslearn-openai repository to a local folder (it doesn’t matter which folder).
- When the repository has been cloned, open the folder in Visual Studio Code.
Note: If Visual Studio Code shows you a pop-up message to prompt you to trust the code you are opening, click on Yes, I trust the authors option in the pop-up.
4. Wait while additional files are installed to support the C# code projects in the repo.
Note: If you are prompted to add required assets to build and debug, select Not Now.
Configure your application
Applications for both C# and Python have been provided, as well as a sample text file you’ll use to test the summarization. Both apps feature the same functionality. First, you’ll complete some key parts of the application to enable using your Azure OpenAI resource.
- In Visual Studio Code, in the Explorer pane, browse to the Labfiles/06-use-own-data folder and expand the CSharp or Python folder depending on your language preference. Each folder contains the language-specific files for an app into which you’re you’re going to integrate Azure OpenAI functionality.
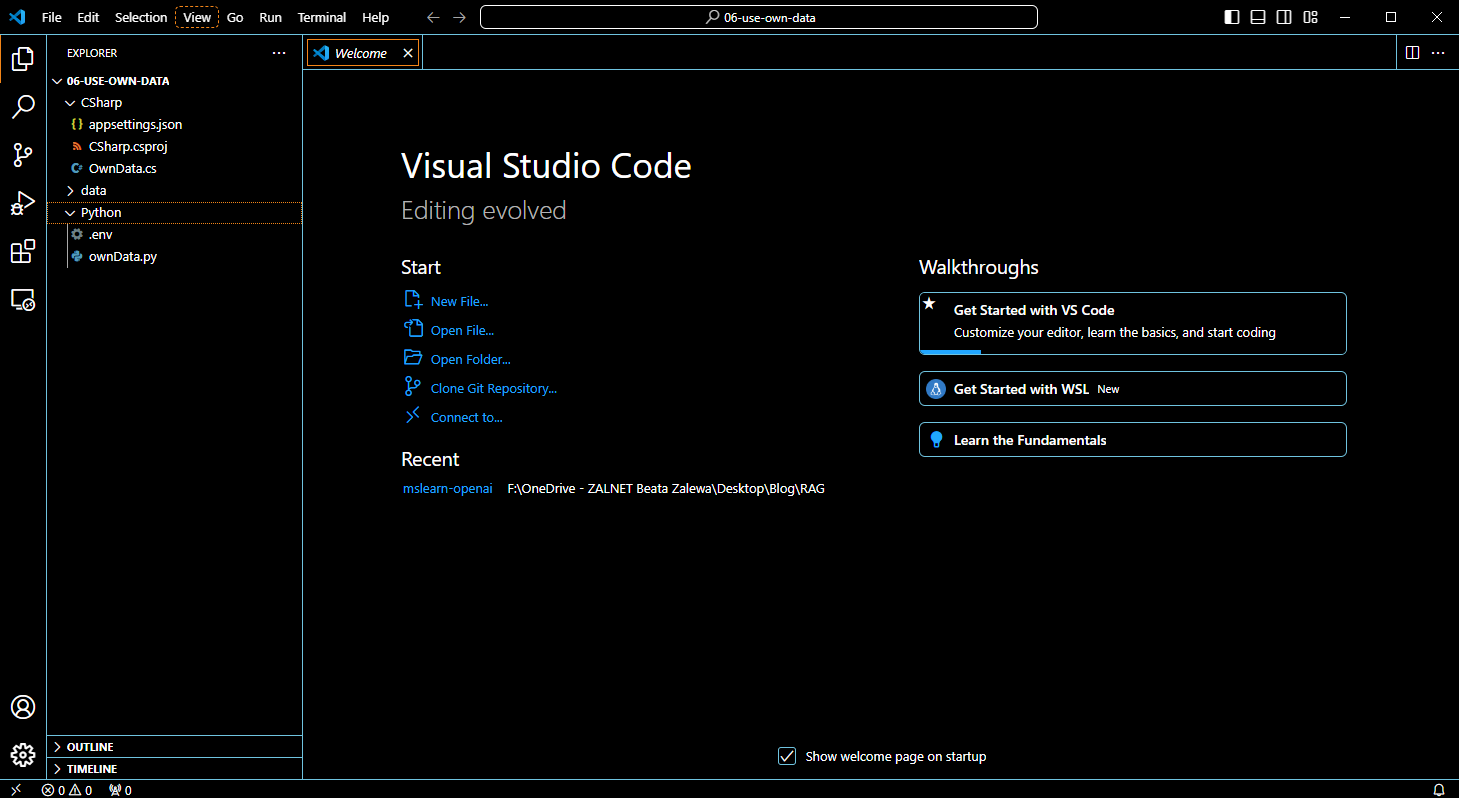
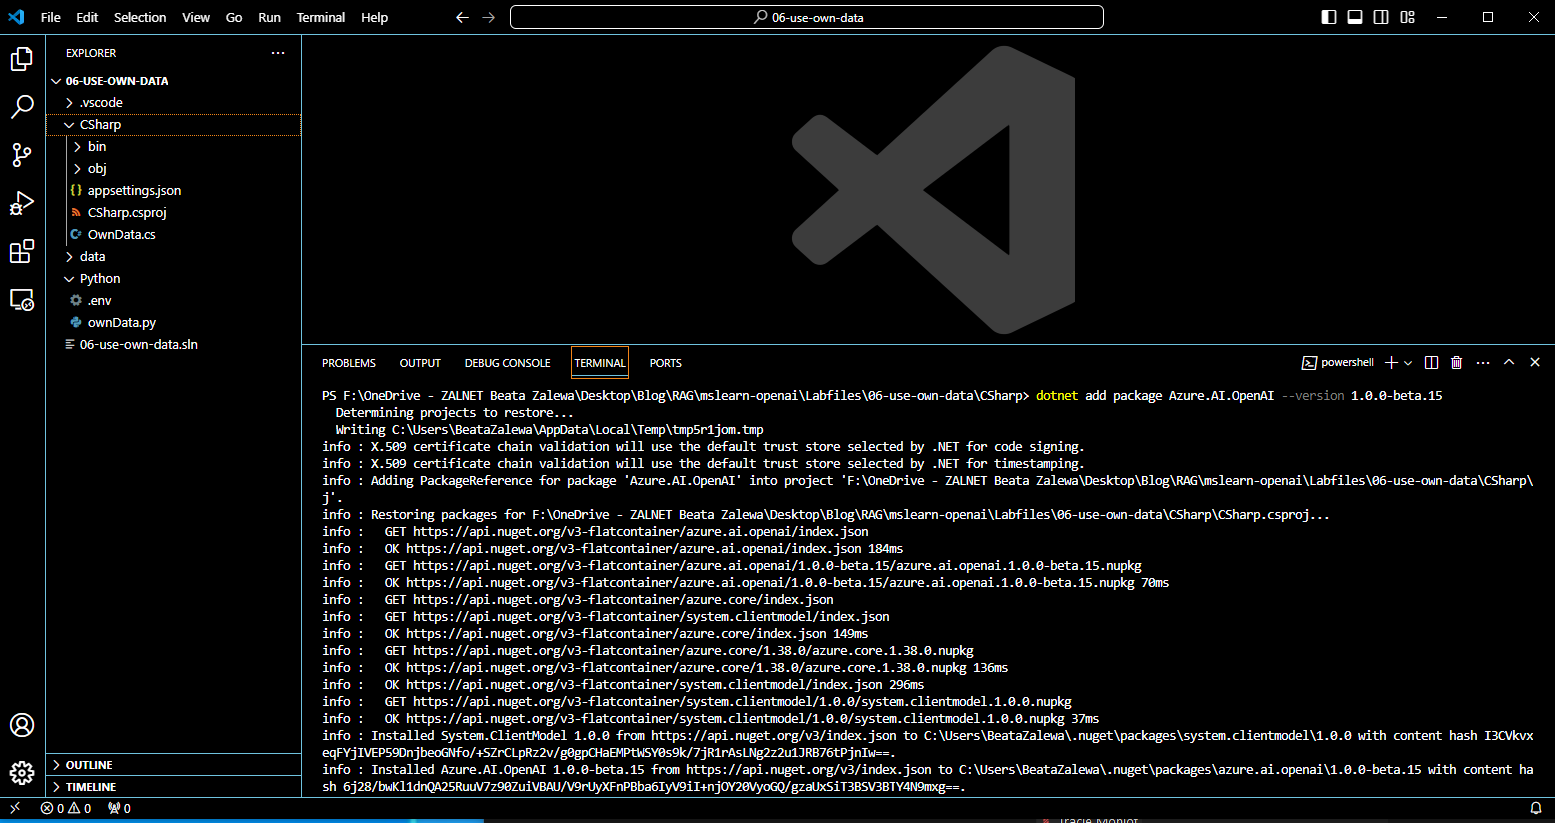
2. Right-click the CSharp or Python folder containing your code files and open an integrated terminal. Then install the Azure OpenAI SDK package by running the appropriate command for your language preference:
C#:
dotnet add package Azure.AI.OpenAI –version 1.0.0-beta.15
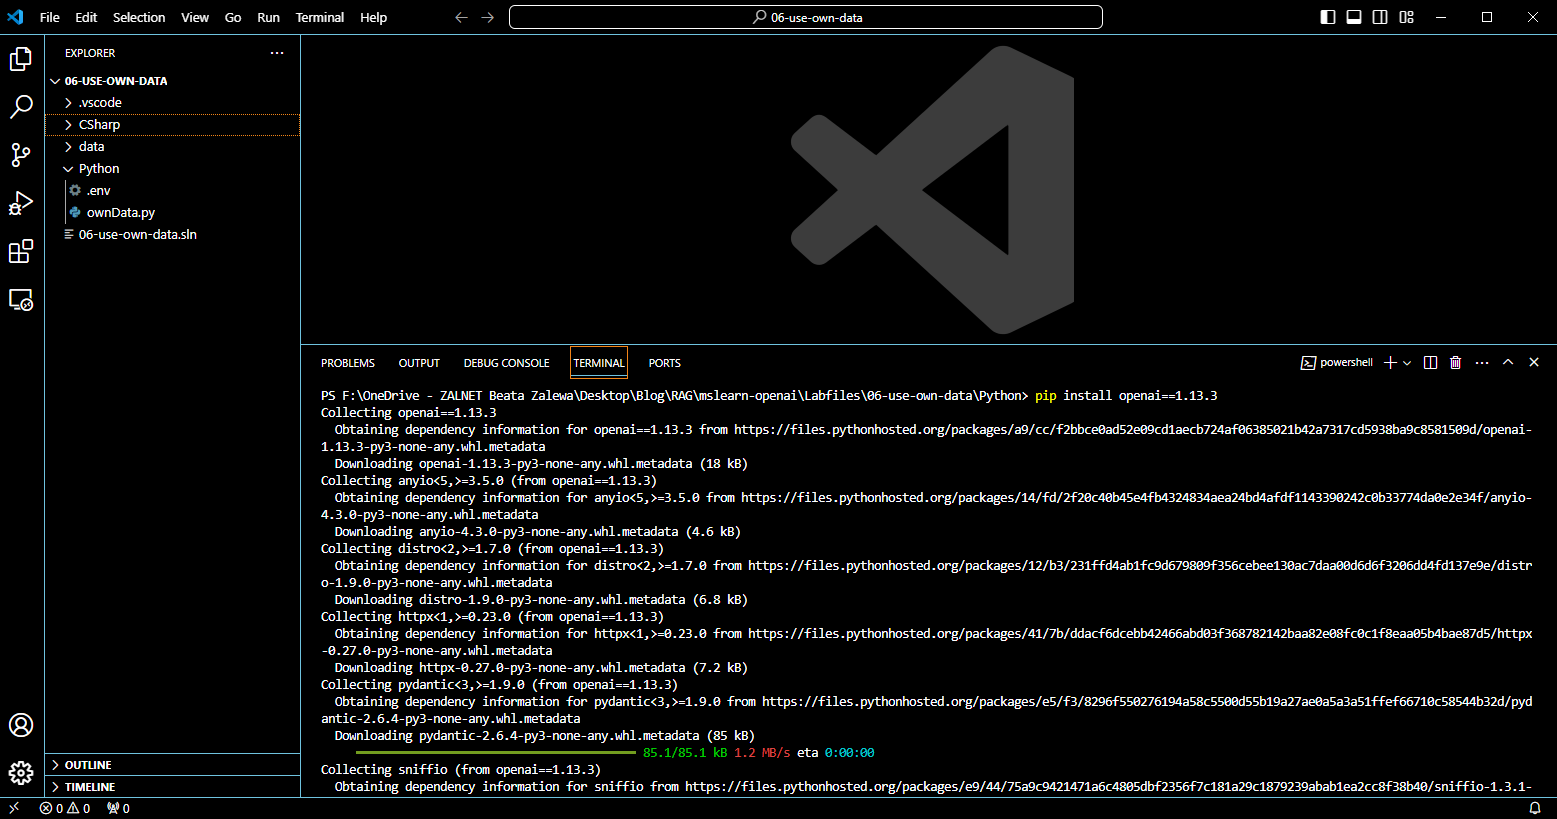
Python:
pip install openai==1.13.3
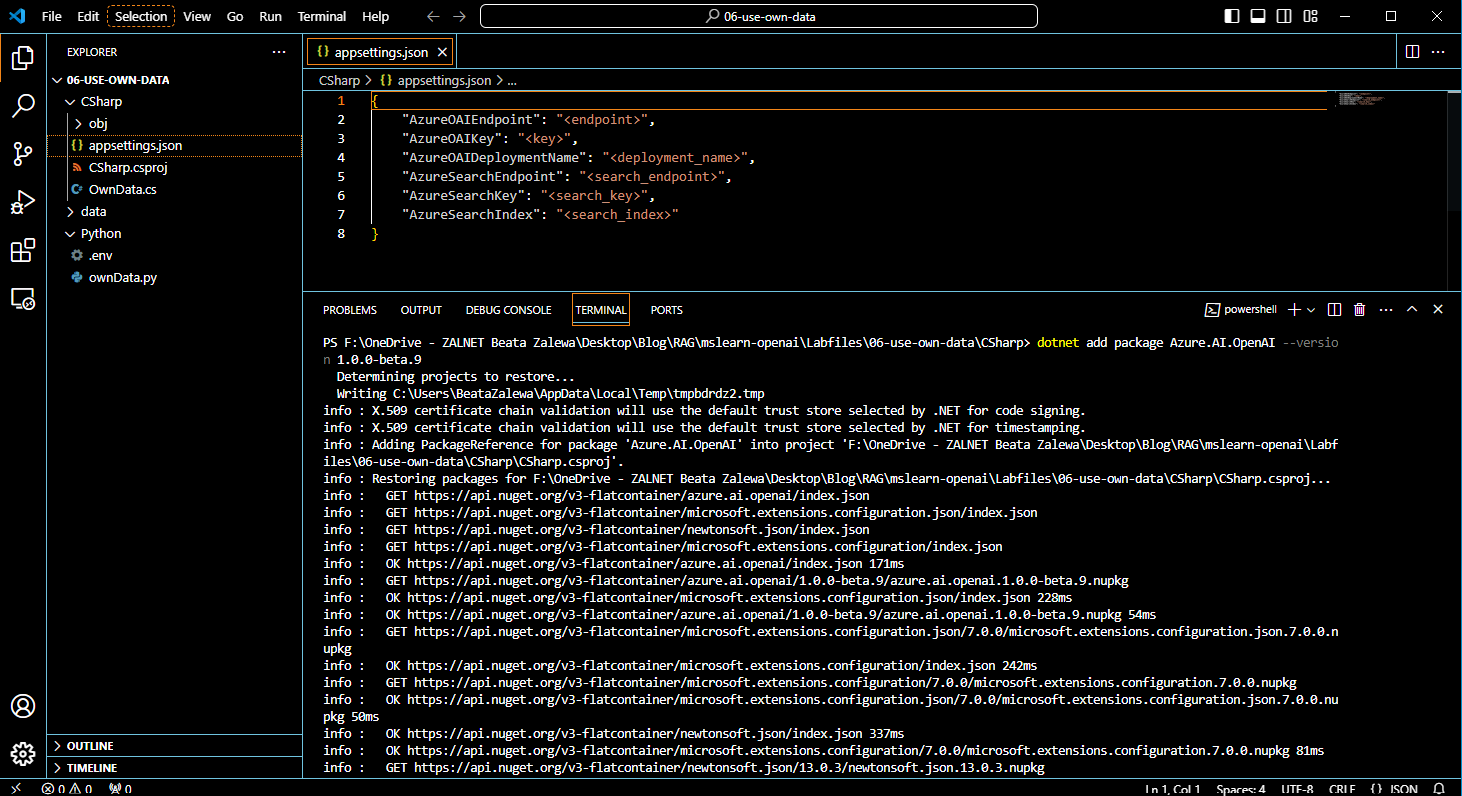
3. In the Explorer pane, in the CSharp or Python folder, open the configuration file for your preferred language
C#:
appsettings.json
Python:
.env

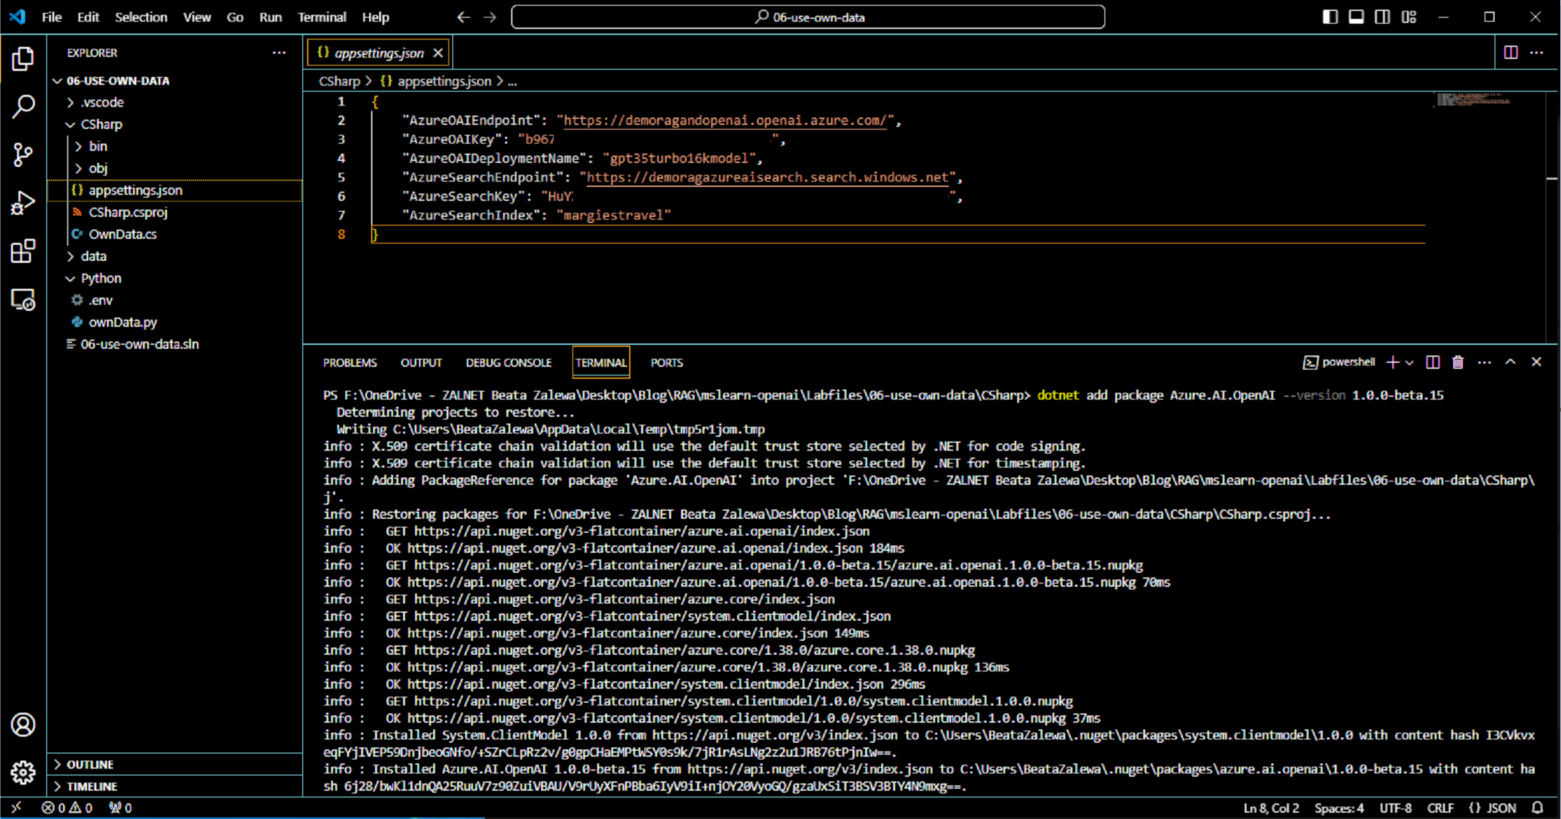
4. Update the configuration values to include:
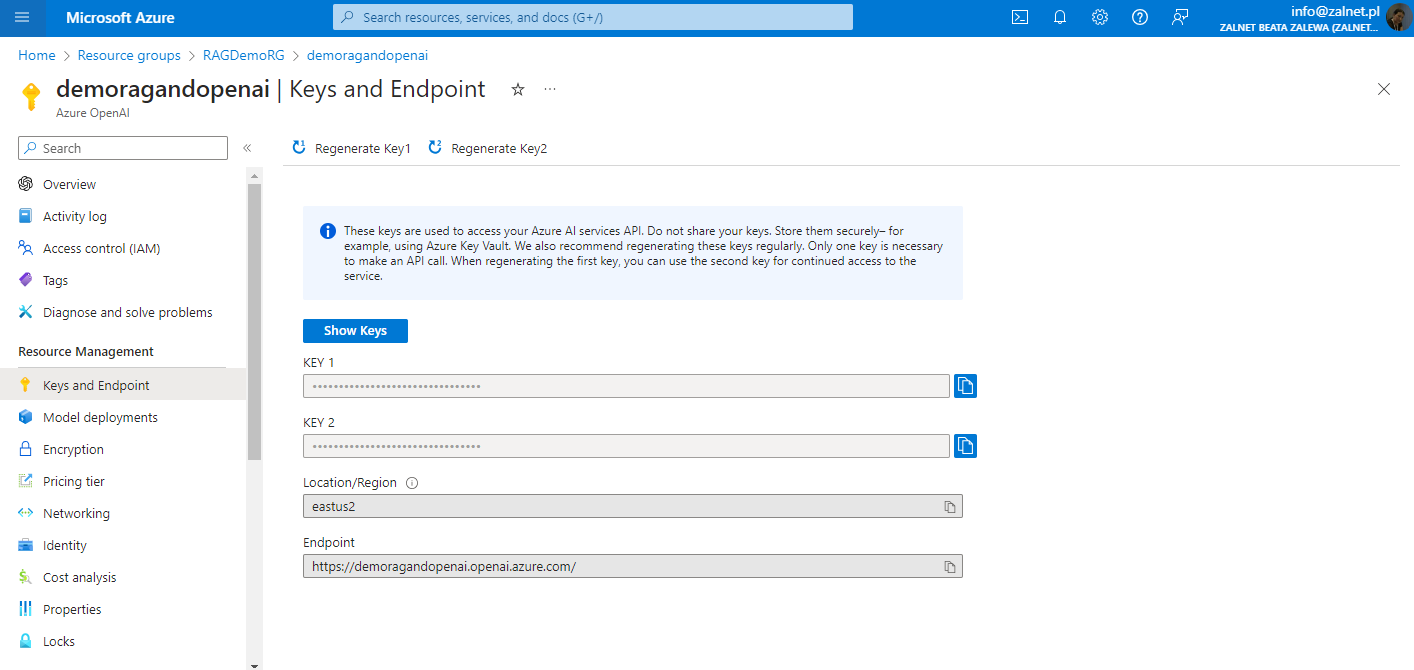
- The endpoint and a key from the Azure OpenAI resource you created (available on the Keys and Endpoint page for your Azure OpenAI resource in the Azure portal)
- The deployment name you specified for your model deployment (available in the Deployments page in Azure OpenAI Studio).

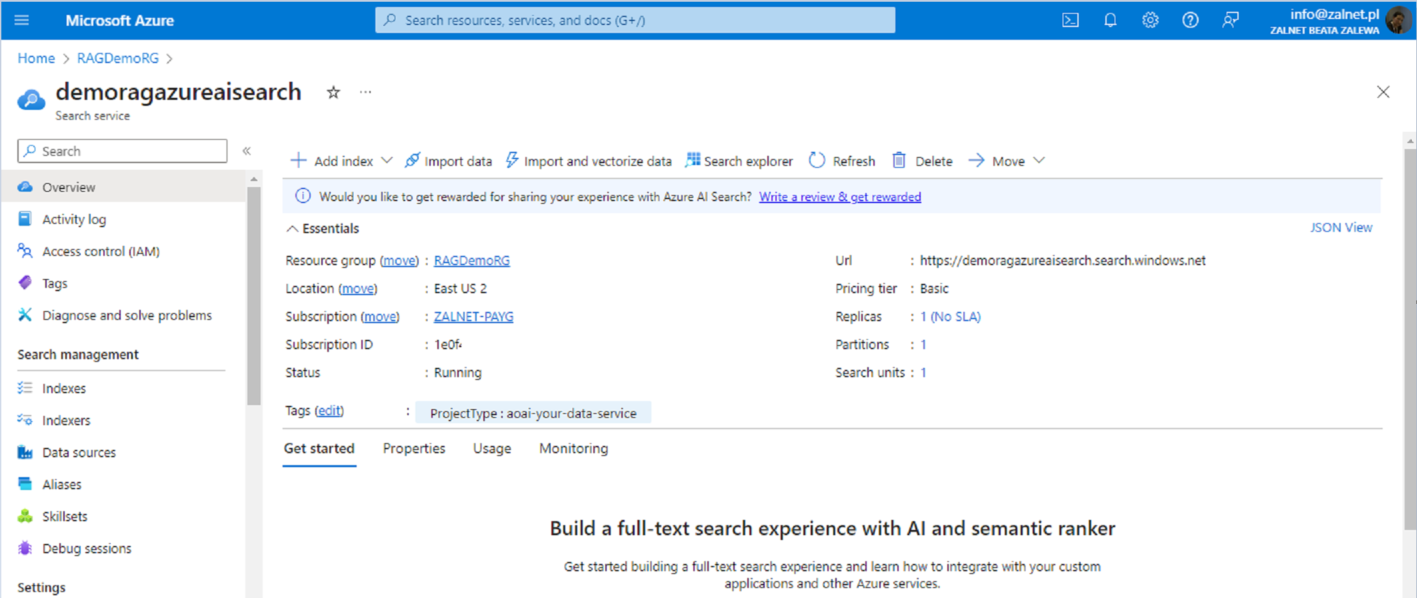
- The endpoint for your search service (the Url value on the overview page for your search resource in the Azure portal).
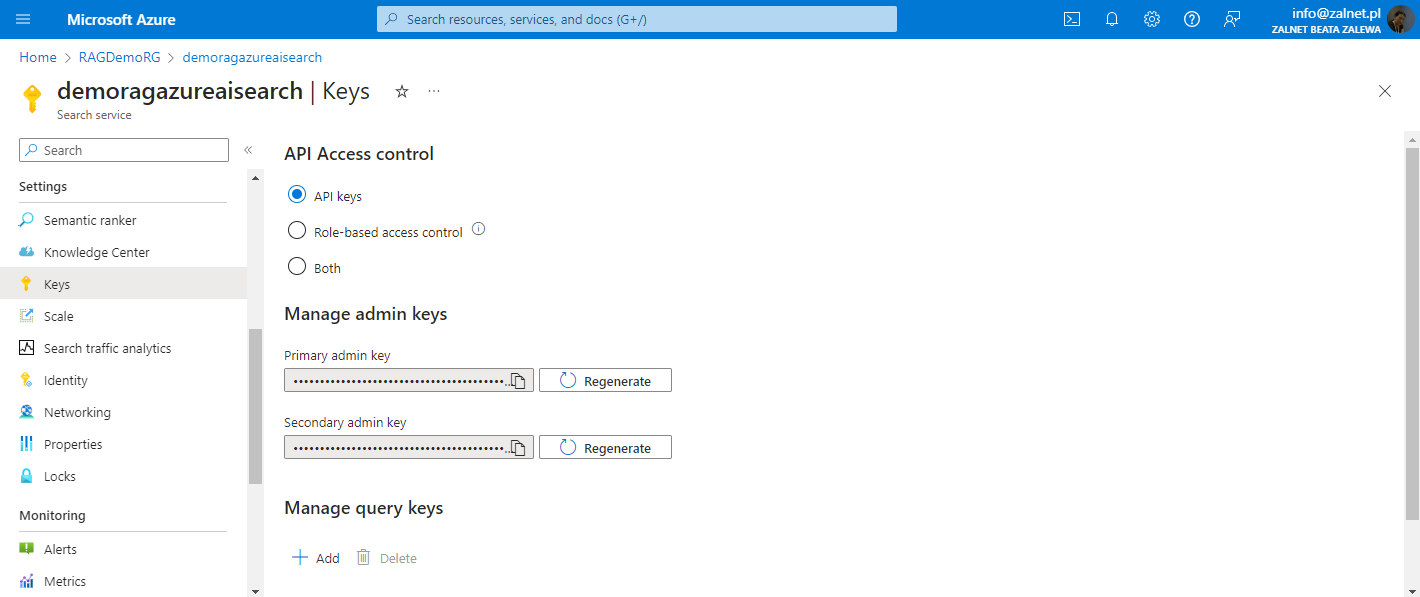
- A key for your search resource (available in the Keys page for your search resource in the Azure portal – you can use either of the admin keys).
- The name of the search index (which should be margiestravel).

5. Save the configuration file (below appsettings.json file).
Add code to use the Azure OpenAI service
Now you’re ready to use the Azure OpenAI SDK to consume your deployed model.
- In the Explorer pane, in the CSharp or Python folder, open the code file for your preferred language, and replace the comment Add Azure OpenAI package with code to add the Azure OpenAI SDK library:
C#: ownData.cs
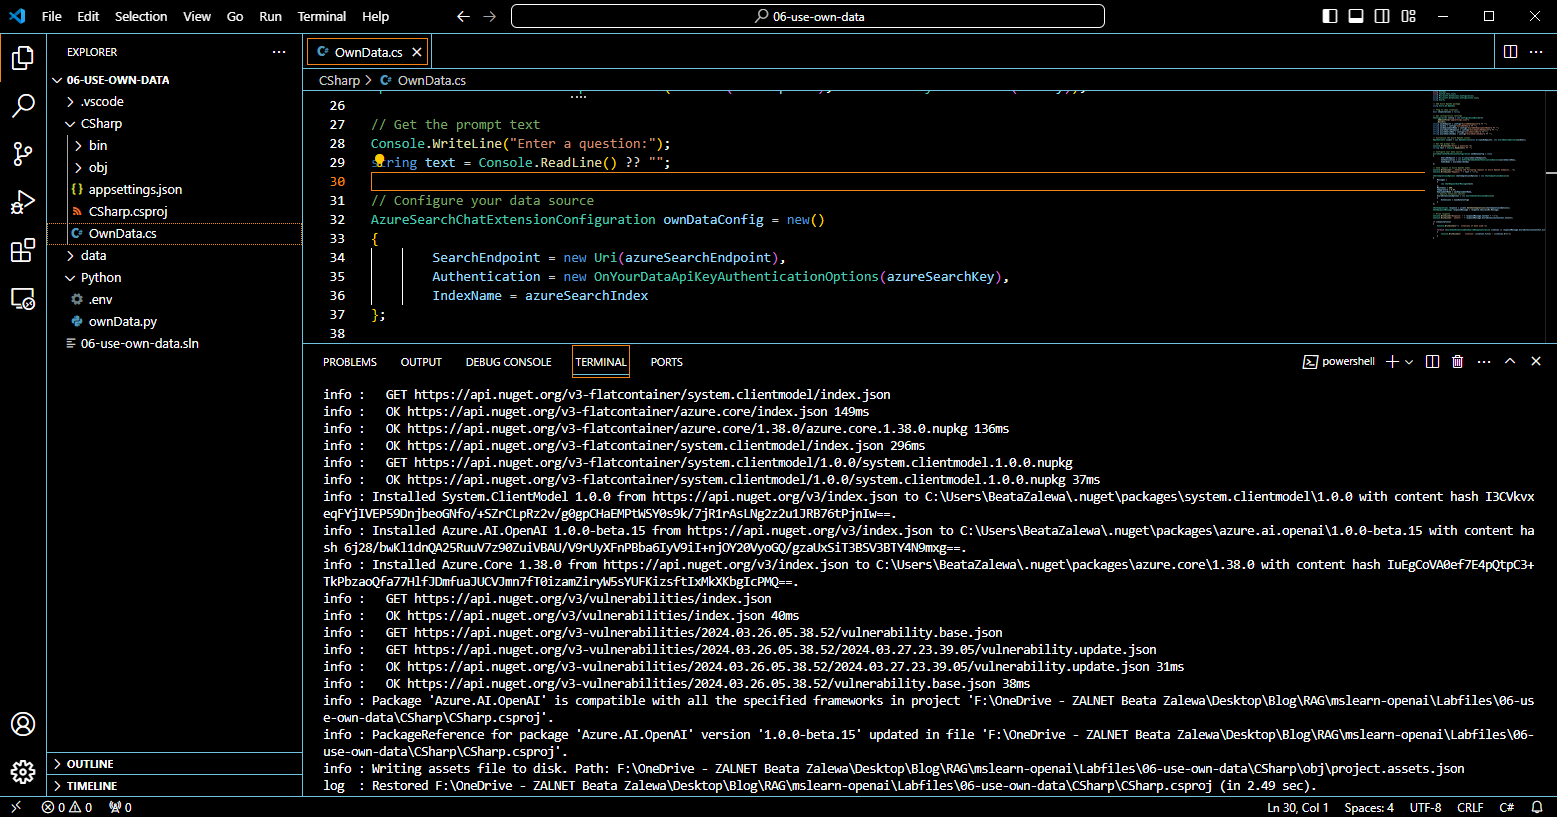
// Configure your data source
AzureSearchChatExtensionConfiguration ownDataConfig = new()
{
SearchEndpoint = new Uri(azureSearchEndpoint),
Authentication = new OnYourDataApiKeyAuthenticationOptions(azureSearchKey),
IndexName = azureSearchIndex
};
Python:
ownData.py
# Configure your data source
extension_config = dict(dataSources = [
{
“type”: “AzureCognitiveSearch”,
“parameters”: {
“endpoint”:azure_search_endpoint,
“key”: azure_search_key,
“indexName”: azure_search_index,
}
}]
2. Review the rest of the code, noting the use of the extensions to the request body that are used to provide information about the data source settings.
3. Save the changes to the code file.
Run your application
Now that your app has been configured, run it to send your request to your model and observe the response. You’ll notice the only difference between the different options is the content of the prompt, all other parameters (such as token count and temperature) remain the same for each request.
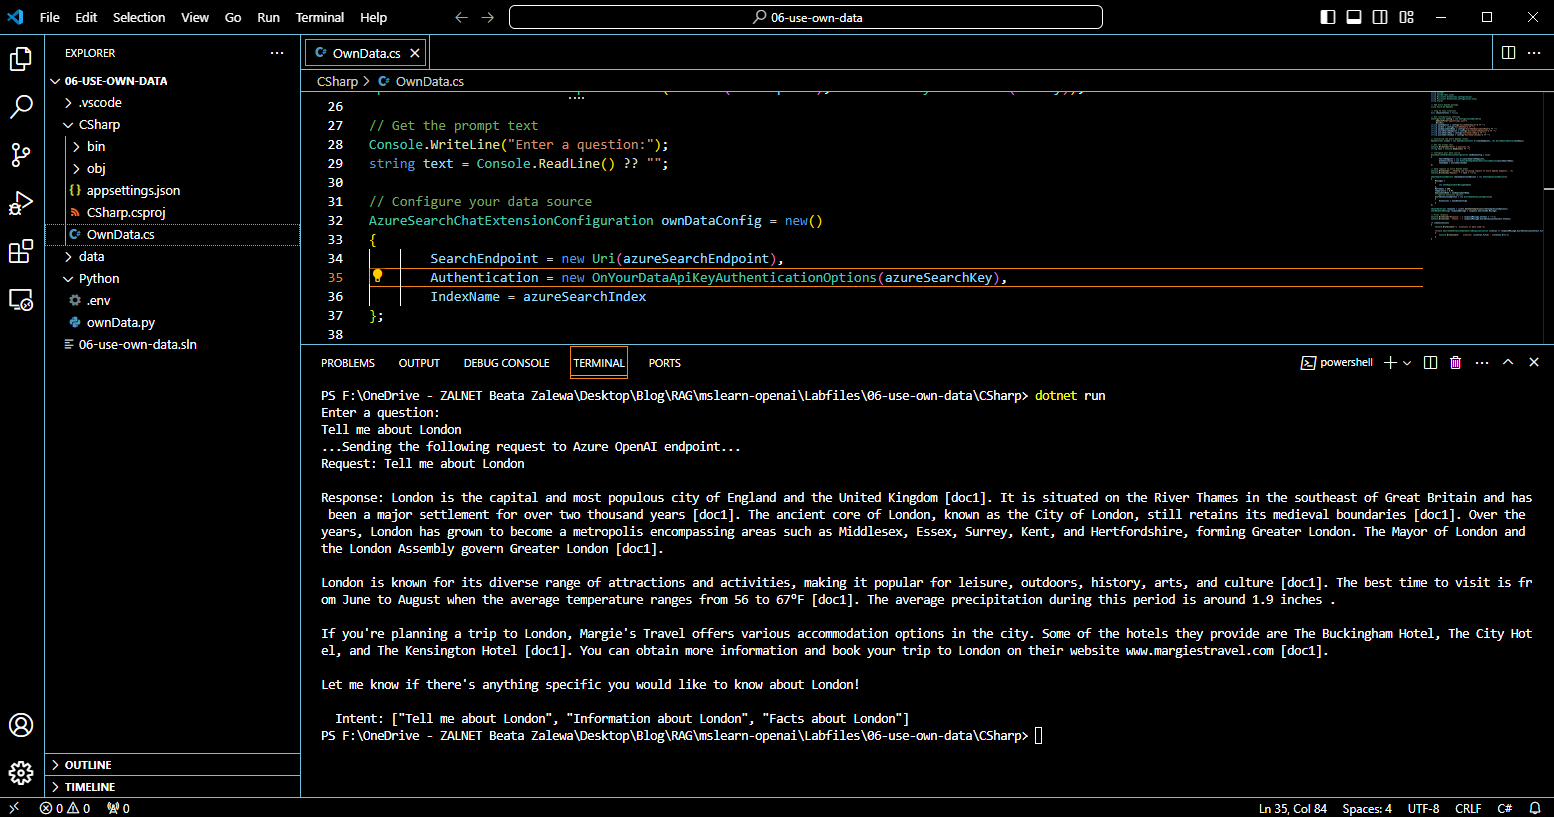
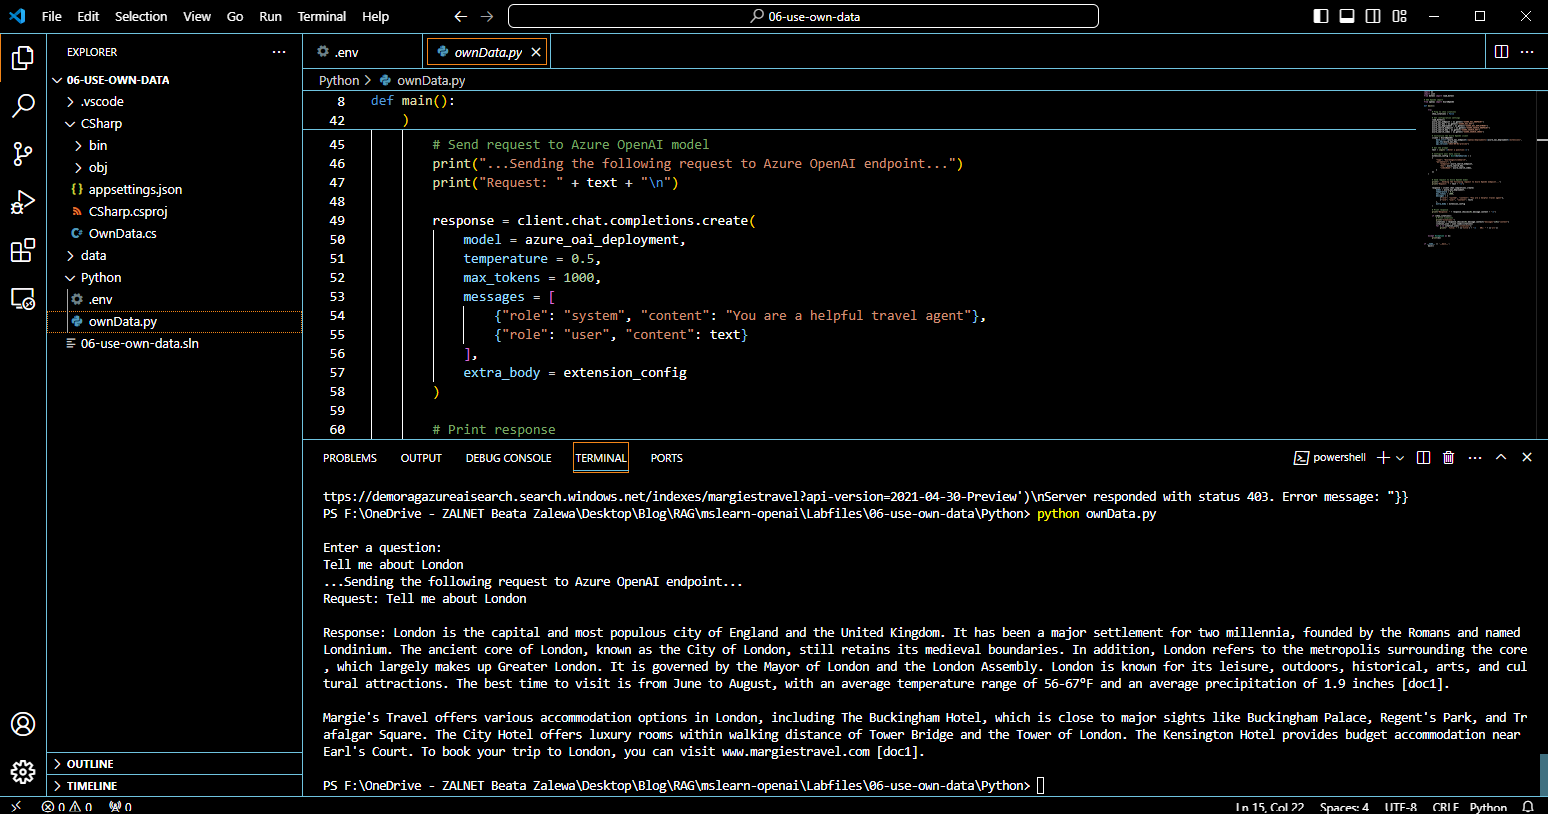
In the interactive terminal pane, ensure the folder context is the folder for your preferred language. Then enter the following command to run the application. Review the response to the prompt Tell me about London, which should includes an answer as well as some details of the data used to ground the prompt, which was obtained from your search service.
Tip: If you want to see the citations from your search index, set the variable show citations near the top of the code file to true.
C#:
dotnet run
Tip: You can use the Maximize panel size (^) icon in the terminal toolbar to see more of the console text.
Python:
pip install python-dotenv
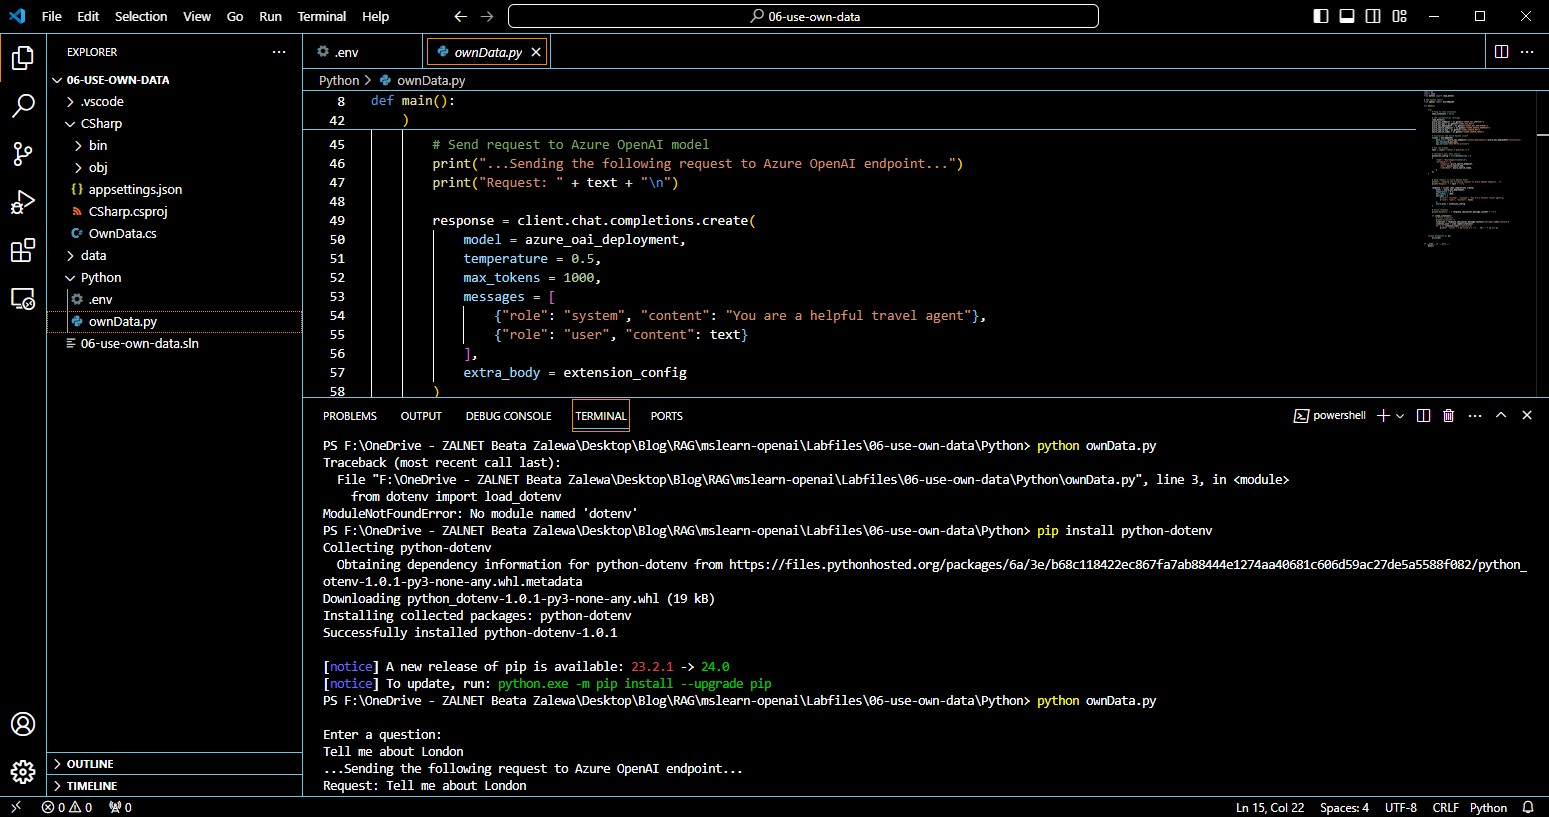
python ownData.py
Tip: You can use the Maximize panel size (^) icon in the terminal toolbar to see more of the console text.
Clean up
When you’re done with your Azure OpenAI resource, remember to delete the resource in the Azure portal at https://portal.azure.com. Be sure to also include the storage account and search resource, as those can incur a relatively large cost.

